How to get all Document IDs for a library?
Last updated: 2026-10-13
Collect Document IDs alongside file paths for migration mapping, copied links, and destination-location lookups using a read-only item inventory.
Use SharePoint Essentials Toolkit to report on a document library and include its Document ID metadata. This gives you a practical way to match document identifiers to file names and SharePoint paths without editing the documents.
Applies to: SharePoint Essentials Toolkit 2027. The screenshots show Community Edition.
Why report on Document IDs?
Migration mapping: build a reference of Document IDs and source paths, then compare it with migration results to identify the corresponding destination files.
Find the current file location: map a Document ID to the file’s SharePoint URL or library/folder path.
Map to a copy link or new location: use the inventory as a lookup when associating existing references with a copied link or a destination URL.
Validate and reconcile documents: check for missing values and compare source and destination inventories.
Document ID is not the same as the numeric list item ID or a sharing link. This report reads the existing metadata; it does not create Document IDs, generate sharing links, or guarantee that an ID is preserved by a migration. Keep the source and destination paths in your mapping and verify how your migration or copy process handles IDs.
Before you start
Add the relevant SharePoint site to the toolkit and connect with an account that can read the library and its metadata. Confirm that the documents have Document ID values in SharePoint. If the field is unavailable or blank, check your site’s Document ID Service configuration and whether SharePoint has assigned the values.
1. Choose the item inventory task
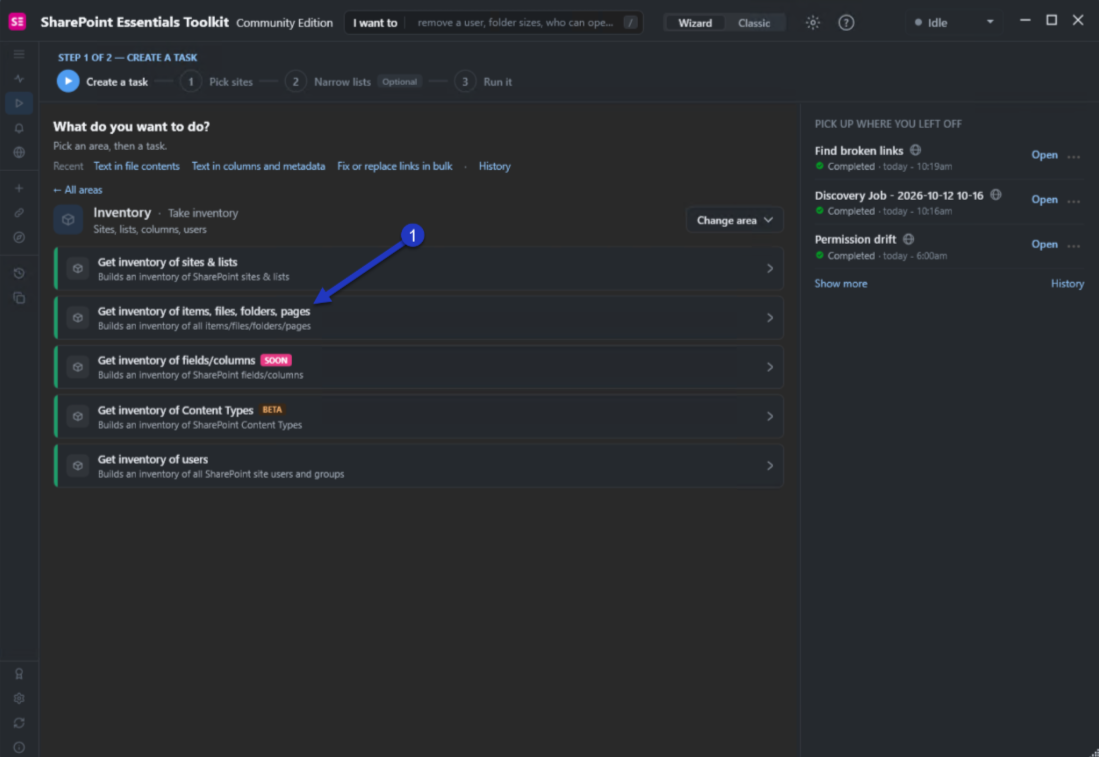
Open Tasks.
Choose the Inventory area.
Select Get inventory of items, files, folders, pages (marker 1).
2. Select the library
Use Sites and Lists & content to select the site and document library you want to report on. Review the scope so the job includes the intended library rather than unrelated lists or libraries.
To collect all available Document IDs, leave Content Filters off unless you intentionally want a subset. Review any other item limits before running the job.
3. Include the Document ID field
Select Report in the job options (marker 1 in the screenshot below).
Under Additional Fields, find Specify any additional SharePoint Fields to include in the report.
Enter Document ID (marker 2), as shown below.
Review Maximum Records to Display. The screenshot shows 50,000; This only affects what is displayed at run-time for performance purposes, the complete report will be loaded once the task is completed.
Click Run Now (marker 3).
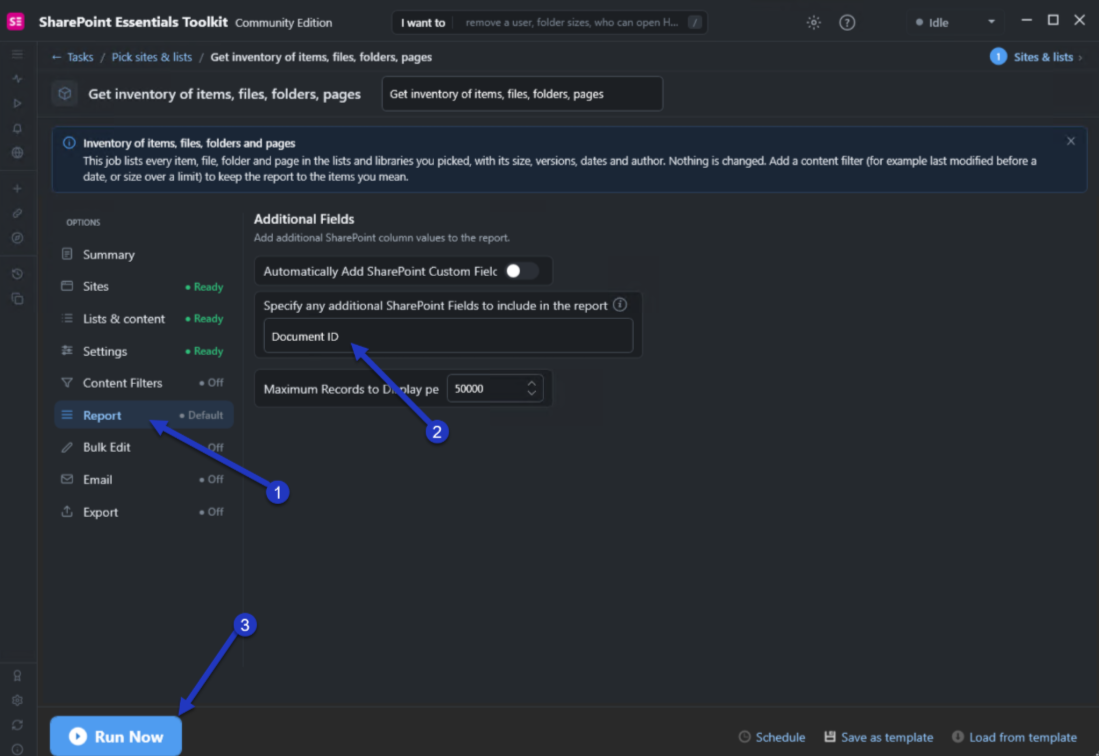
This is a read-only inventory. Leave Bulk Edit off; no editing is needed to retrieve Document IDs.
4. Review and export the mapping
When the job finishes, open the results and locate the Document ID column. Retain the file name and available URL/path columns alongside it. Export the report using the job’s report export options if you need to compare it in a spreadsheet or with migration output.
For a migration or relocation reference, keep columns such as Document ID, source file path, and destination URL or copy link. The destination or copy-link values come from your migration results or the links you collect separately, not automatically from the source inventory.
Check the job logs and reported item count before treating the export as a complete library inventory. Blank Document ID values may indicate that no ID has been assigned; folders and other non-document items may not have one. If the column is missing, verify the field name and its availability in the selected library.
Use the same approach for any metadata field
Document ID is just one example. Use the same Report → Additional Fields option to request any other metadata field available on your items or files. The field must exist in the selected list or library and be accessible to your account.
For a broader walkthrough, see How to report on item and file metadata?