How to Automatically Fix Links in SharePoint (2027)
Last updated: 2026-10-15
Find and replace URLs across SharePoint pages, navigation, web parts, lists, and Office documents in the 2027 release. Preview with Flag Only, order replacement rules, and preserve authors with user mapping.
Find and replace URLs across pages, navigation, web parts, list items, and Office documents.
Applies to version 12 (2027 release). Updated 14 October 2026.
Use this guide when a migration, a renamed site, or a moved library has left old URLs in SharePoint and you want the SharePoint Essentials Toolkit to update them. The toolkit finds the links. You supply the old value and the new value. It does not invent the correct URL.
A link does not have to be broken. The same job updates any URL that matches a rule, including links that still open.
If you used the previous version
The 2026 guide started from the Home page: select sites, then Links, then Find & Replace Links, then a row of tabs (Summary, Settings, Find & Replace, Inclusion Rules, Additional Fields, Email, Export).
In 2027 that path is gone. Open Tasks, choose the Links area, and choose the task that updates URLs. One summary page replaces the tabs. A left Options menu on that page opens each part: Summary, Sites, Lists & content, Content Filters, Link Filters, Validation, Find & replace, Report, Email, and Export. The Find & replace page has two tabs, Rules and User mapping.
A Classic layout is still available from the Tasks page if you prefer sites, lists, and tasks side by side. The steps below use the Wizard, which is what a new installation opens.
Before you start
You need a connection and at least one site on the Tasks page. If the toolkit is not connected yet, follow the Quick Setup guide first: activate the license, add a connection, then add sites.
Which permission you need
The account that runs the job needs a different permission depending on whether you only report, you replace links, or you also keep the original Modified By person and date.
What you are doing | Minimum permission |
|---|---|
Find broken links, link inventory, or find specific links | Read |
Replace links, and leave Modified By as the account that ran the job | Edit (Contribute is enough) |
Replace links and keep the previous Modified By person and date (Preserve Author) | Full Control, or Site Collection Administrator |
Preserve Author is on by default. If the account only has Edit, turn Preserve Author off or the job will not be able to write the original author back. Full Control is not required for the replacement itself.
Which edition
Find and replace links is available in every edition. Community and Professional process lists and libraries of up to 100 items. Enterprise does not have that cap. A migration of a large library needs Enterprise, or the job will stop at the edition limit.
Check these before a large run
Run the rules against one small site first. Turn on Flag Only so the first run only previews the new URLs.
Checked-out files cannot be updated unless they are checked out to the account running the job. Check them in, or expect those rows to fail.
If a library uses content approval, a replaced file or publishing page can stay Pending instead of Published. The 2027 release does not yet keep the approved state. Plan for someone to approve the files, or use the 2019 release if you need Preserve Content Approval State.
System lists such as Microfeed and the Style Library are already excluded. You do not need to exclude them yourself.
The four link tasks
On the Tasks page, the Links area is labeled Broken links, fixed in bulk. It contains four tasks. This guide is the fourth one, the task that writes changes. The other three only report.
Task | What it does | Changes SharePoint? |
|---|---|---|
Find broken links | Opens each link and reports the status, including broken links. | No |
Link inventory | Lists every link and does not test whether it opens. This is the fast way to see what is in the content. | No |
Find one or more specific links | You enter one or more full or partial URLs, one per line. The report shows only where those URLs are used. | No |
Fix or replace links in bulk | Applies your old-value / new-value rules to pages, navigation, web parts, and Office documents. | Yes, unless Flag Only is on |
1. Start the task
Open Tasks in the left menu.
Under What do you want to do?, select Links.
Select the task 'Fix or replace links in bulk'.
You can also type in the I want to box, for example replace links or broken links, and press Enter. The slash key focuses that box from any page.
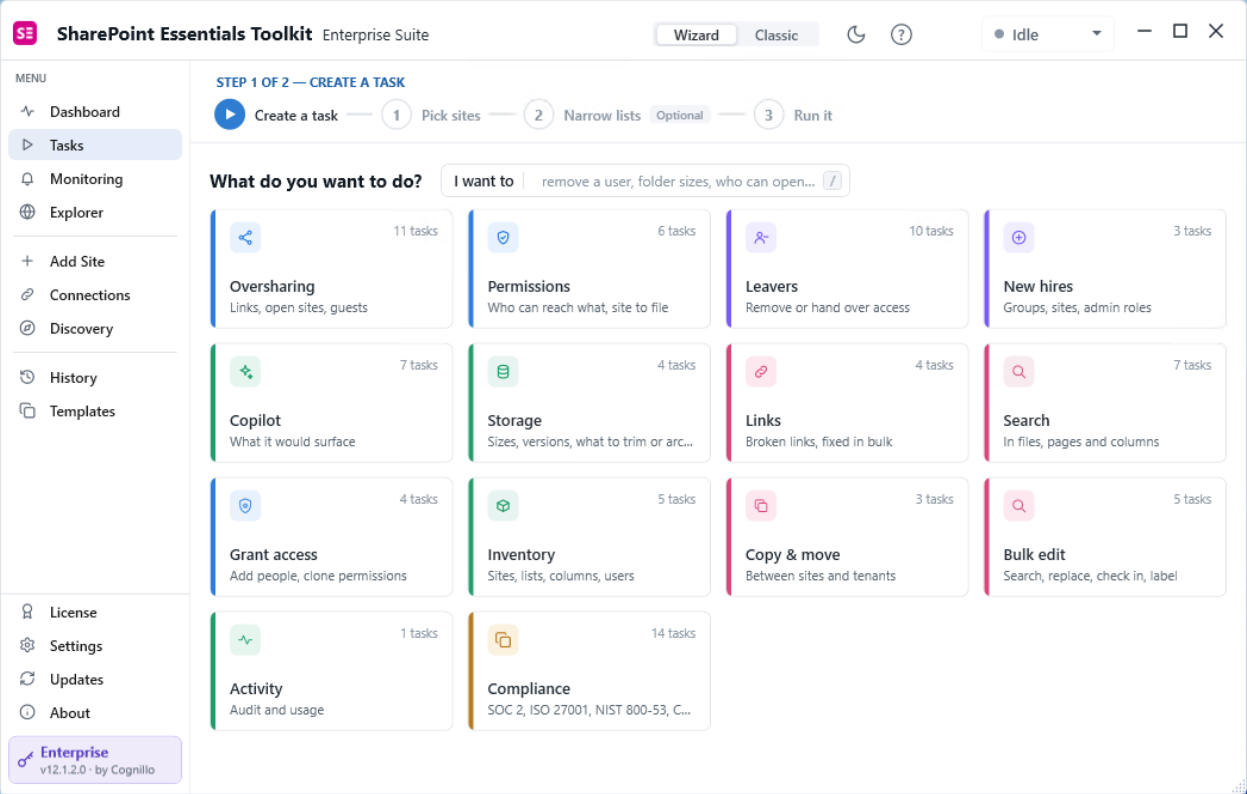
Figure 1a. Tasks page in the 2027 release. Links is the area labeled “Broken links, fixed in bulk” and it lists 4 tasks. The build in this picture is 12.1.0.0. Version 12.1.2.0 uses the same wizard.
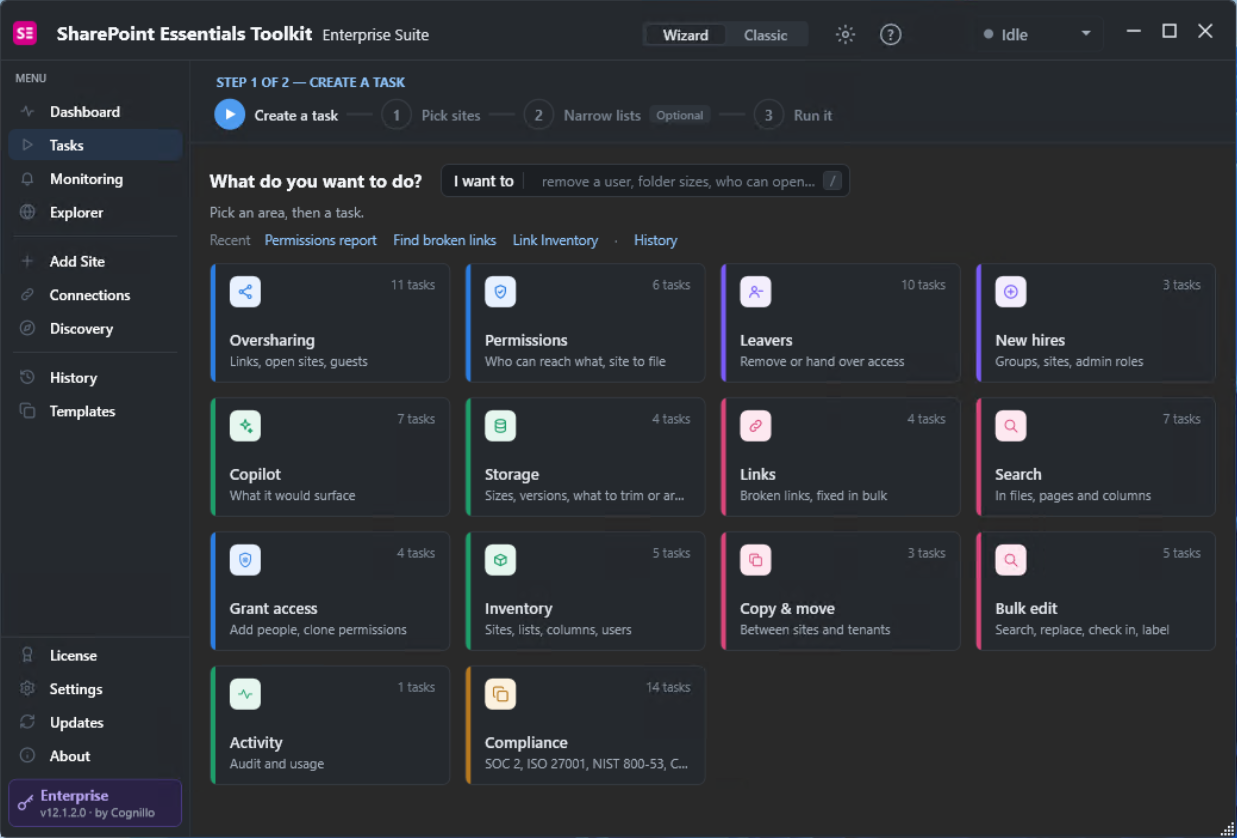
Figure 1b. Enable Dark Mode using icon in top bar.
The Wizard walks through Create a task, Pick sites, Narrow lists (optional), and Run it. To switch to Classic, use the Wizard / Classic control in the title bar while you are on Tasks. Classic shows sites, lists, and tasks at the same time. The job options page is the same in both layouts.
2. Pick the sites and lists
Under Pick sites to work with, tick the sites to update. Expand a site if you need a subsite.
Narrow it to specific lists is optional. Leave every box clear to include the whole site. Tick a library or list to limit the job to that list.
Check the In scope counts on the right. They are an estimate of sites, lists, and items.
Select Next.
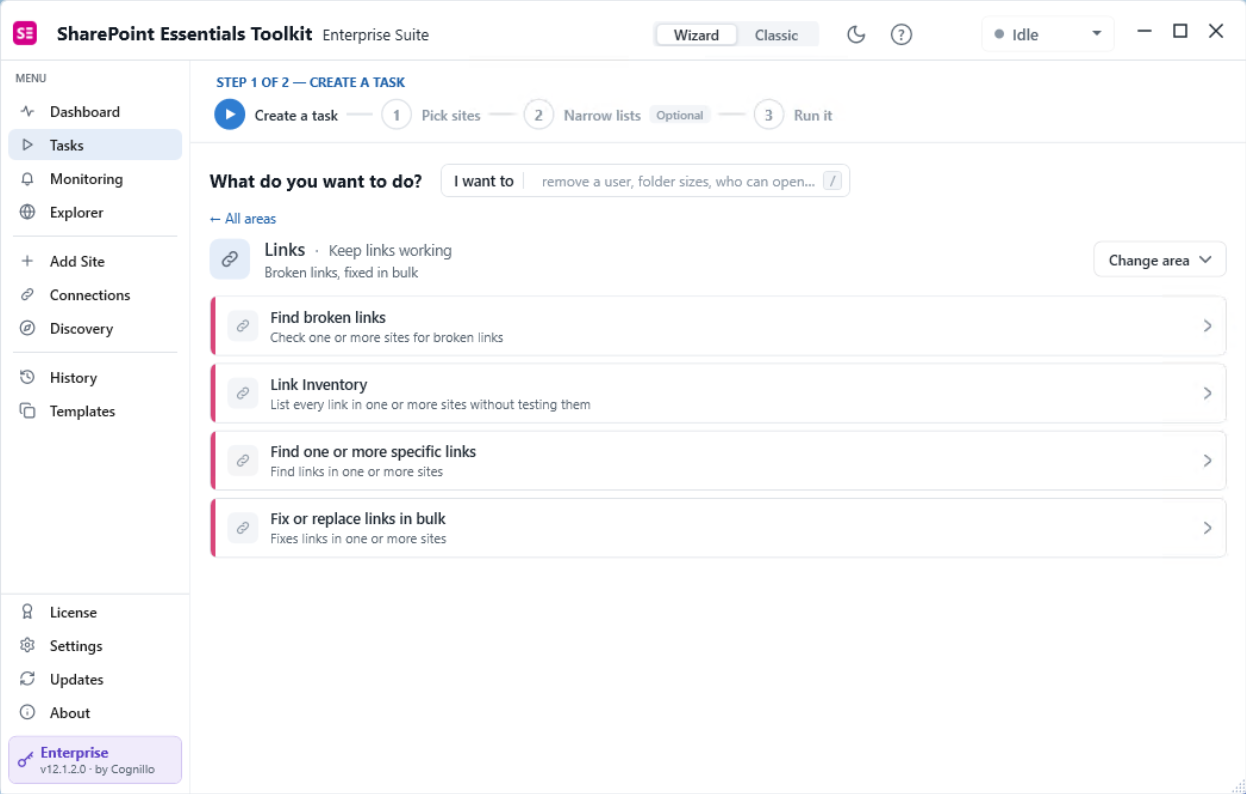
Figure 2a. In wizard mode, clicking a tile will present tasks you can perform against SharePoint sites.
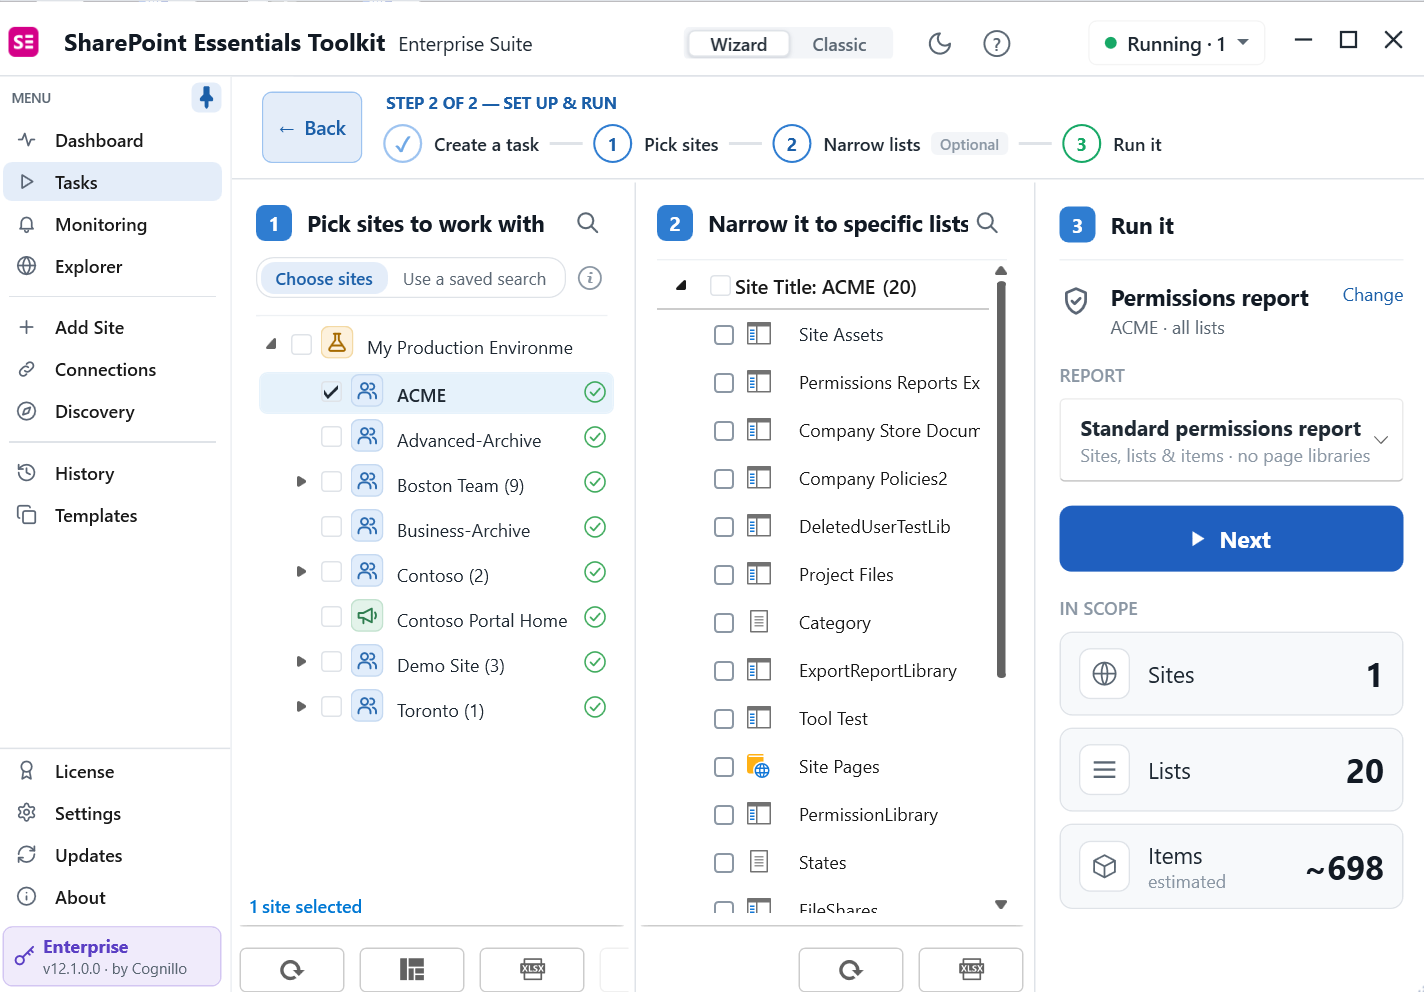
Figure 2b. The site and list step is the same for every task. This product screenshot shows a permissions report in the panel on the right. After you pick a link task, that panel shows the link task name instead. Tick sites on the left. Tick lists in the middle only when you want to limit the job.
Enterprise can use a saved search instead of a fixed list of sites, so sites created later are included the next time the task runs. On the site step, switch from Choose sites to Use a saved search.
3. Read what the job will do
The next page is the job summary. The box at the top is the job name. Change it if you want History to show something other than the default, for example HR old server URLs.
What this job will do is four lines. Each line has an action on the right:
Line | Action | Use it to |
|---|---|---|
Which sites and lists | Change scope | Go back and change the sites or lists. |
What the job will change | Settings | Opens Validation. Rules and Preserve Author are on the Find & replace page. |
What content is included | Add filters | Limit by folder, file type, date, or URL. |
Where the report goes | Set up | Email the report, or export it to a SharePoint library or list. |
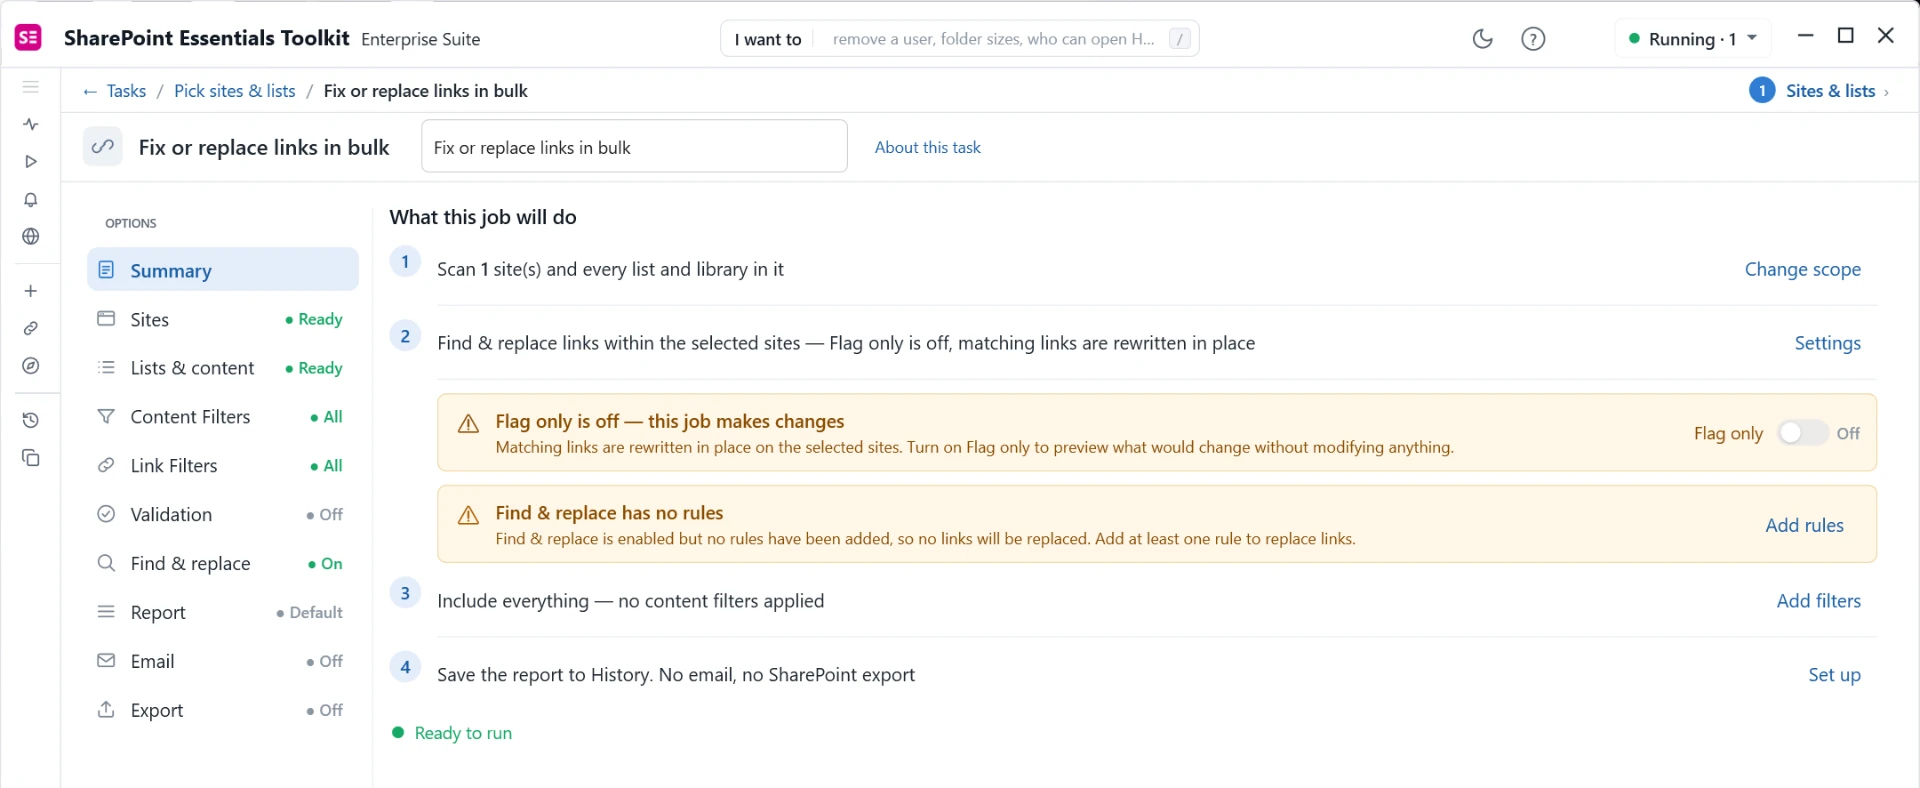
Figure 3. Summary of a Fix or replace links in bulk job before any rule is added. Two warnings appear: Flag only is off, and Find & replace has no rules. The Options menu on the left opens each page directly.
Do not select Run Now until the rules are in the list and you have decided whether this run is a preview (Flag Only) or a real update.
Read the warnings on the summary. Until you add a rule, it shows Find & replace has no rules, with an Add rules link. While Flag only is off, it says the job makes changes, and you can turn on Flag only right there. The job still shows Ready to run in both cases.
Use the Options menu on the left to move between pages. The status beside each page shows what is set, for example Find & replace On or Validation Off. Settings on line 2 opens the Validation page. To add rules, select Find & replace in the menu, or Add rules in the warning.
4. Choose what gets scanned
Select Lists & content in the Options menu. The Inclusions tab lists the places a link job scans. Leave on only the places you intend to update. Turning off file content or metadata on a job that only needs navigation is the easiest way to shorten a large run.
A link job can include or skip each of these. Turn a switch off when that place does not need new URLs:
Navigation links — top navigation, Quick Launch, cascading menus, and mega menus.
Page libraries — modern pages, and classic pages with the limits in the last section of this guide.
SharePoint lists — list item fields, such as hyperlink and note columns.
List attachments — files attached to list items.
Document libraries — files in libraries.
Metadata — column values on items, files, and pages.
File content — links inside Word, Excel, PowerPoint, PDF, and the other file types listed at the end.
Site root pages — classic pages stored at the root of a site, such as default.aspx on project, blog, and community sites. These are scanned in report and Flag only runs only. Links on them are listed but not replaced.
The MS Office Links group on the same tab controls Office files. Hyperlinks in documents are always scanned. Excel macro links and Word macro links are on by default. Excel cell links (a URL typed as plain text in a cell) and Excel formula links (a URL inside a formula) are off by default, because they slow the job down. Turn them on if your workbooks hold links that way, or those links are not found or replaced. Skip files larger than (default 20 MB) is also on this tab.
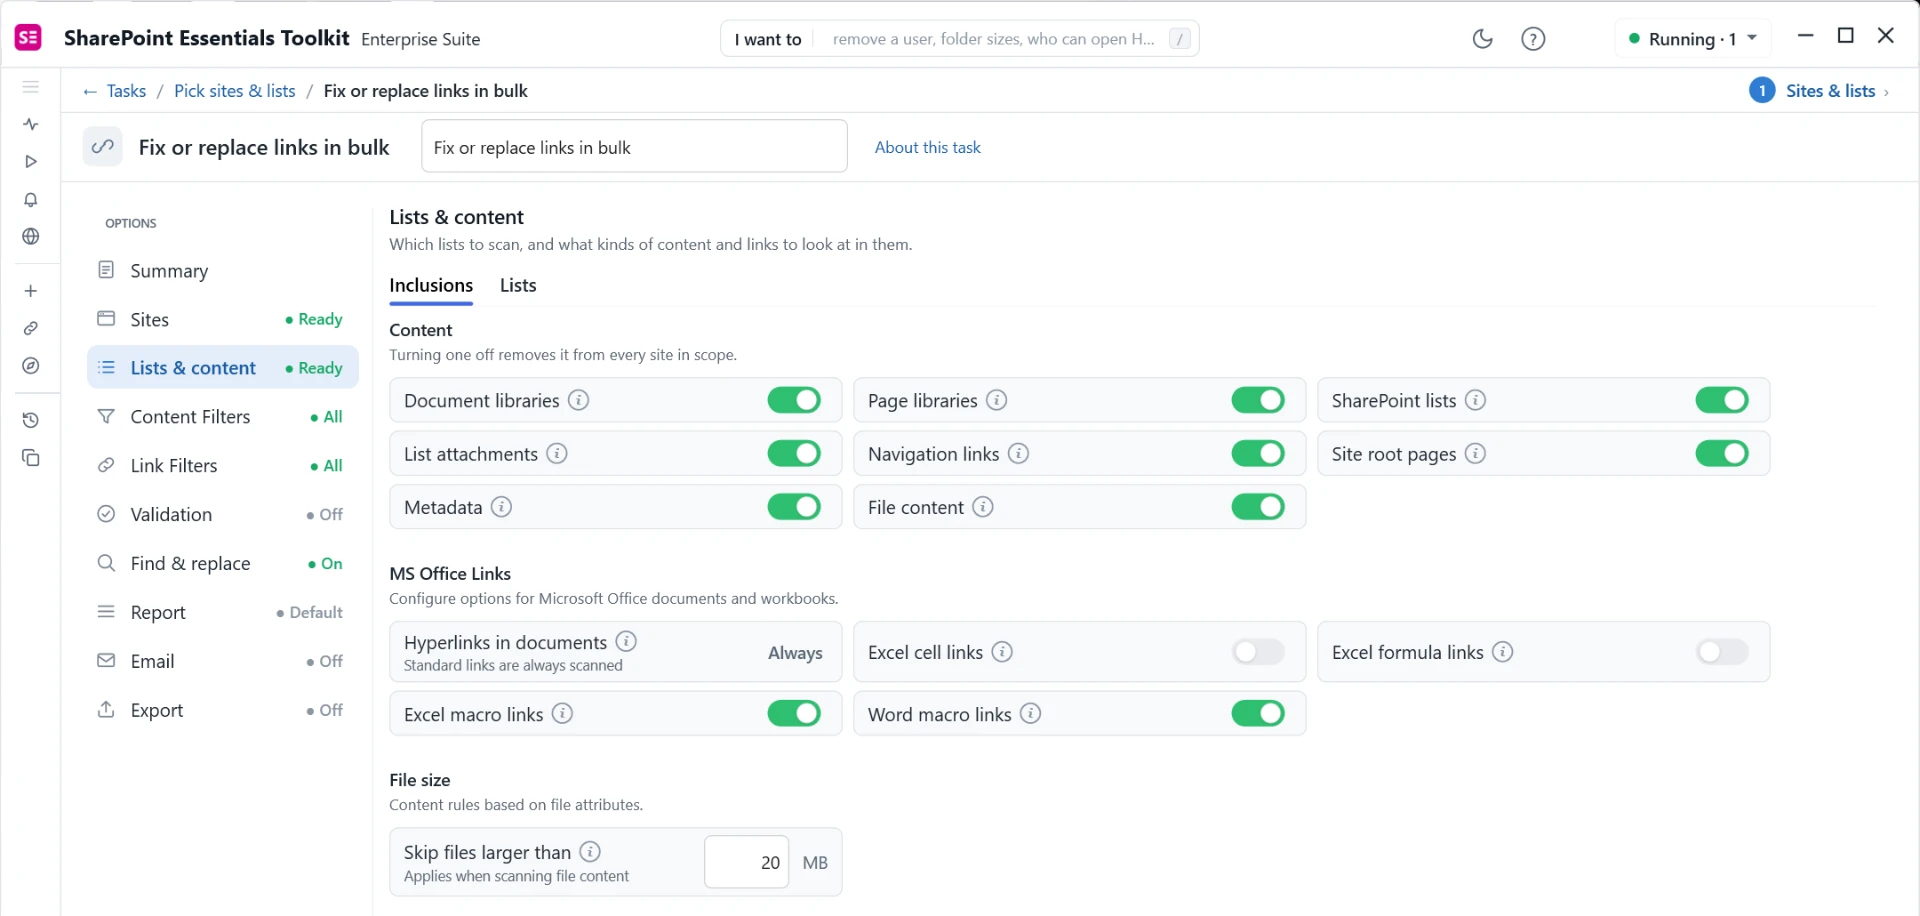
Figure 4. Lists & content, Inclusions tab, for a link job. Turn off what you do not need to update. Excel cell links and Excel formula links are off by default.
If you ticked lists by hand on the previous step, check the switches again. A list you ticked is still skipped when its include switch is off. That includes Document libraries, Page libraries, and SharePoint lists.
Select Content Filters in the Options menu (or Add filters on the summary) when you need a smaller set: a folder path, a file extension, a modified date, or only URLs that contain a value. Add the condition, then confirm it appears in the filter list. A condition is not applied until it is added.
5. Add the replacement rules
Select Find & replace in the Options menu. The page has an Enabled switch at the top right and two tabs:
Rules — the old and new values, Flag only, Preserve Author, and the other replacement options.
User mapping — used only with Preserve Author, when the original Created By or Modified By account no longer exists. See Map users who no longer exist in section 7.
Enabled is on by default for this task. If it is off, the tabs are hidden and the job only reports links. Before you add a rule, the Rules tab shows No rules yet with Add rule and Import. Preserve Author and the other options appear below the list after you add the first rule.
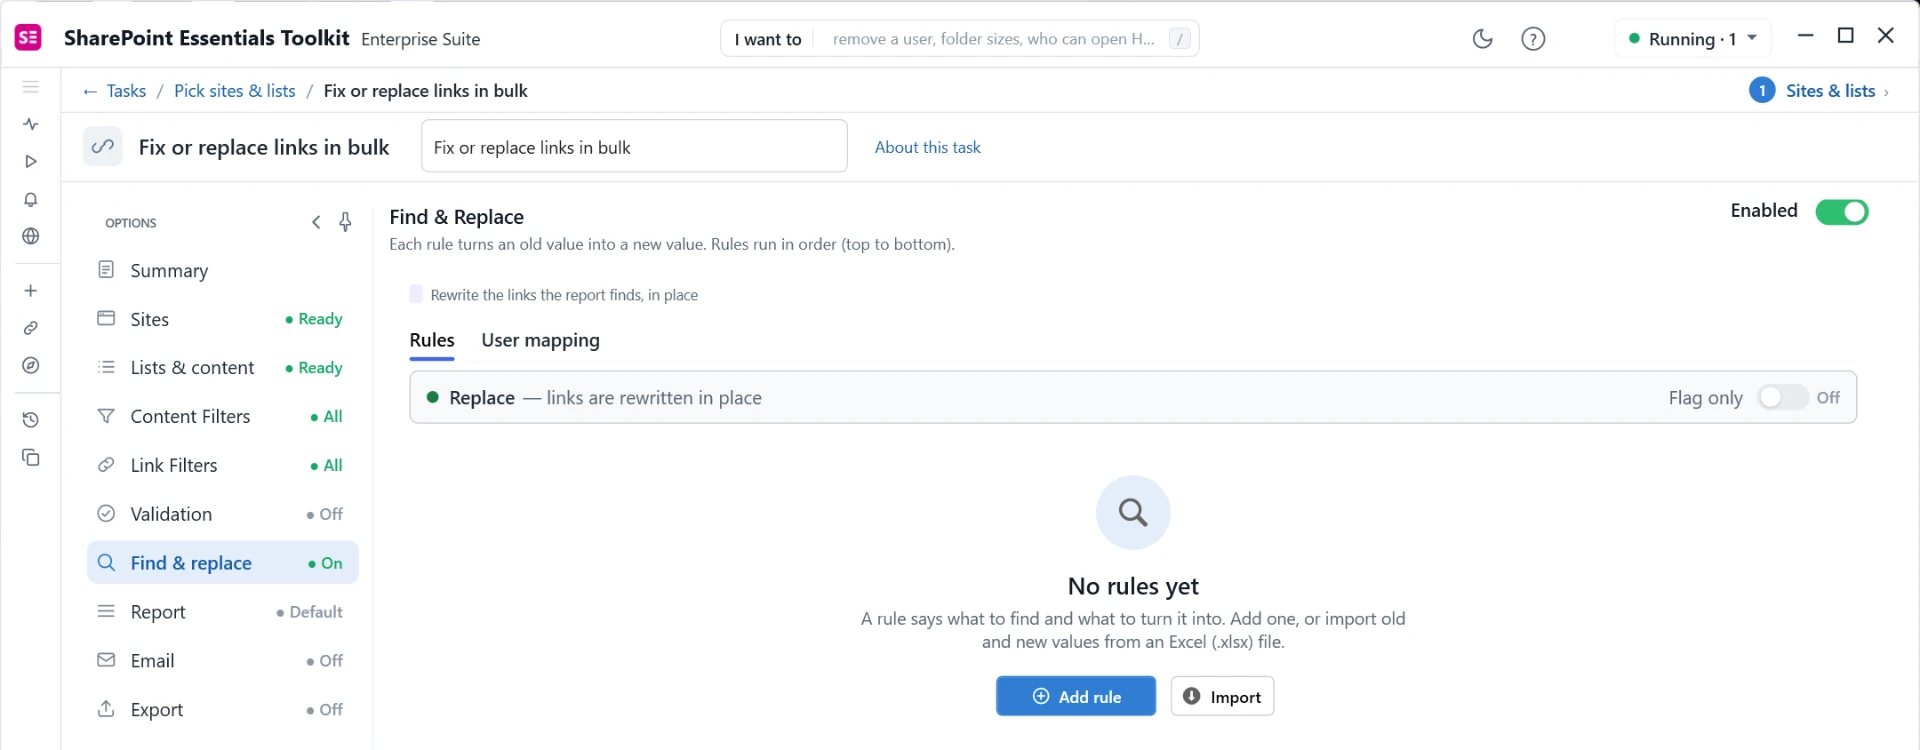
Figure 5a. The Find & replace page before any rule is added. Rules and User mapping are the two tabs under the page title. The Enabled switch is at the top right.
A domain change
For a migration, replace the host first and the site path second. A rule matches part of the URL. This is a partial match, and it is the default.
A link such as:
https://oldserver/sites/hr/documents/folder1/myfile.xlsx
becomes the following when the old value is https://oldserver and the new value is https://tenant.sharepoint.com:
https://tenant.sharepoint.com/sites/hr/documents/folder1/myfile.xlsx
Select Add rule. The editor opens with two boxes: Find links that: and Replace that part with:.
Leave the match type as Contains. In the box beside it, enter the part to find. Example: https://oldserver
In Replace that part with:, enter the replacement. Example: https://tenant.sharepoint.com
Select Add rule inside the editor. The rule must appear in the list below. Typing the values is not enough. The editor stays open for the next rule. Select Cancel when you are done.
To change a rule, double-click it or select the pencil. To change the order, select a rule and use the up and down arrows above the list. Put the rules in the order described in the next section.
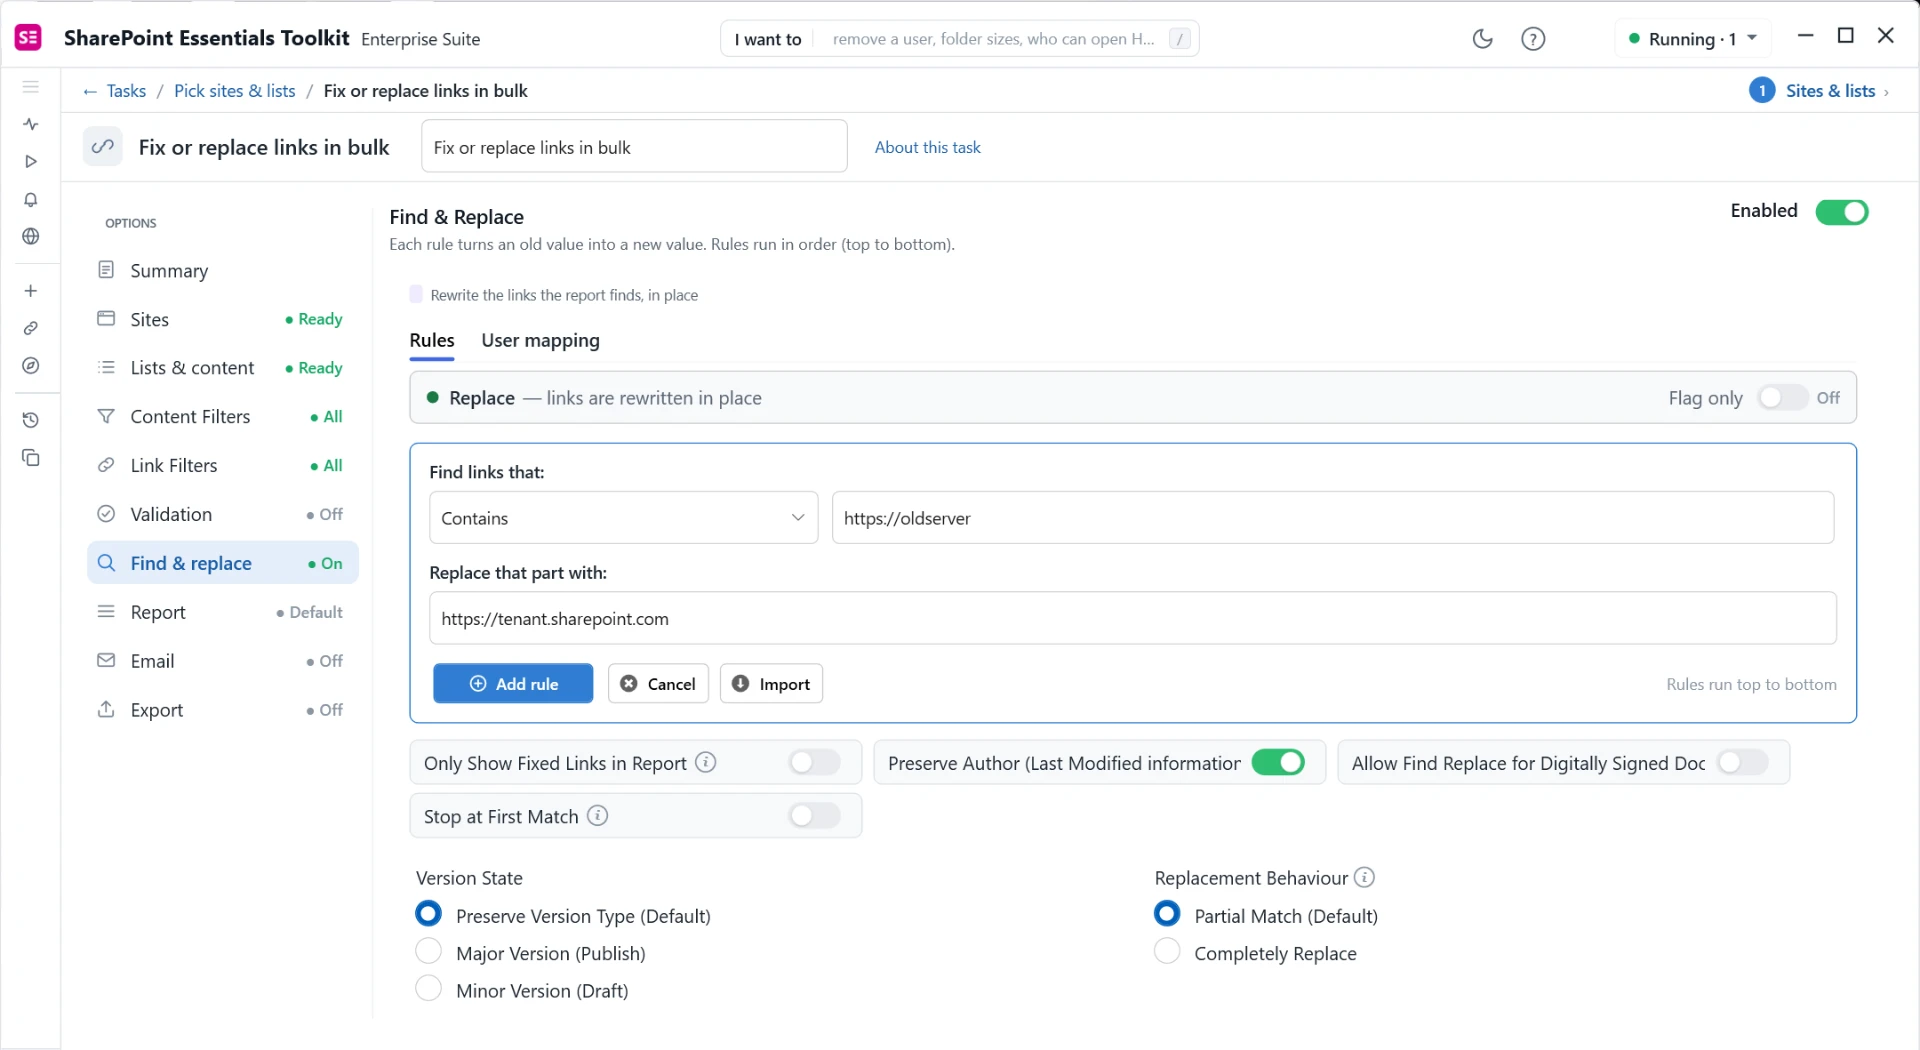
Figure 5b. The rule editor. Choose the match type on the left, type the old value beside it and the new value below, then select Add rule.
A renamed site, on top of the domain
Add a second rule when the site, library, or folder path also changed. Example: /sites/informationtechnology/ moved to /sites/it/.
Order | Old value | New value |
|---|---|---|
1 | https://oldserver | https://tenant.sharepoint.com |
2 | /sites/informationtechnology/ | /sites/it/ |
Pages often store a relative URL, such as /sites/informationtechnology/documents/file.docx, with no host. A single rule of https://oldserver/sites/informationtechnology/ never matches that relative URL. Splitting the host from the path updates both forms. Put the host rule first, then the path rules. Put the longer path above the shorter path. The toolkit walks the list from top to bottom, and a broad rule that runs too early rewrites the URL so a more specific rule never matches.
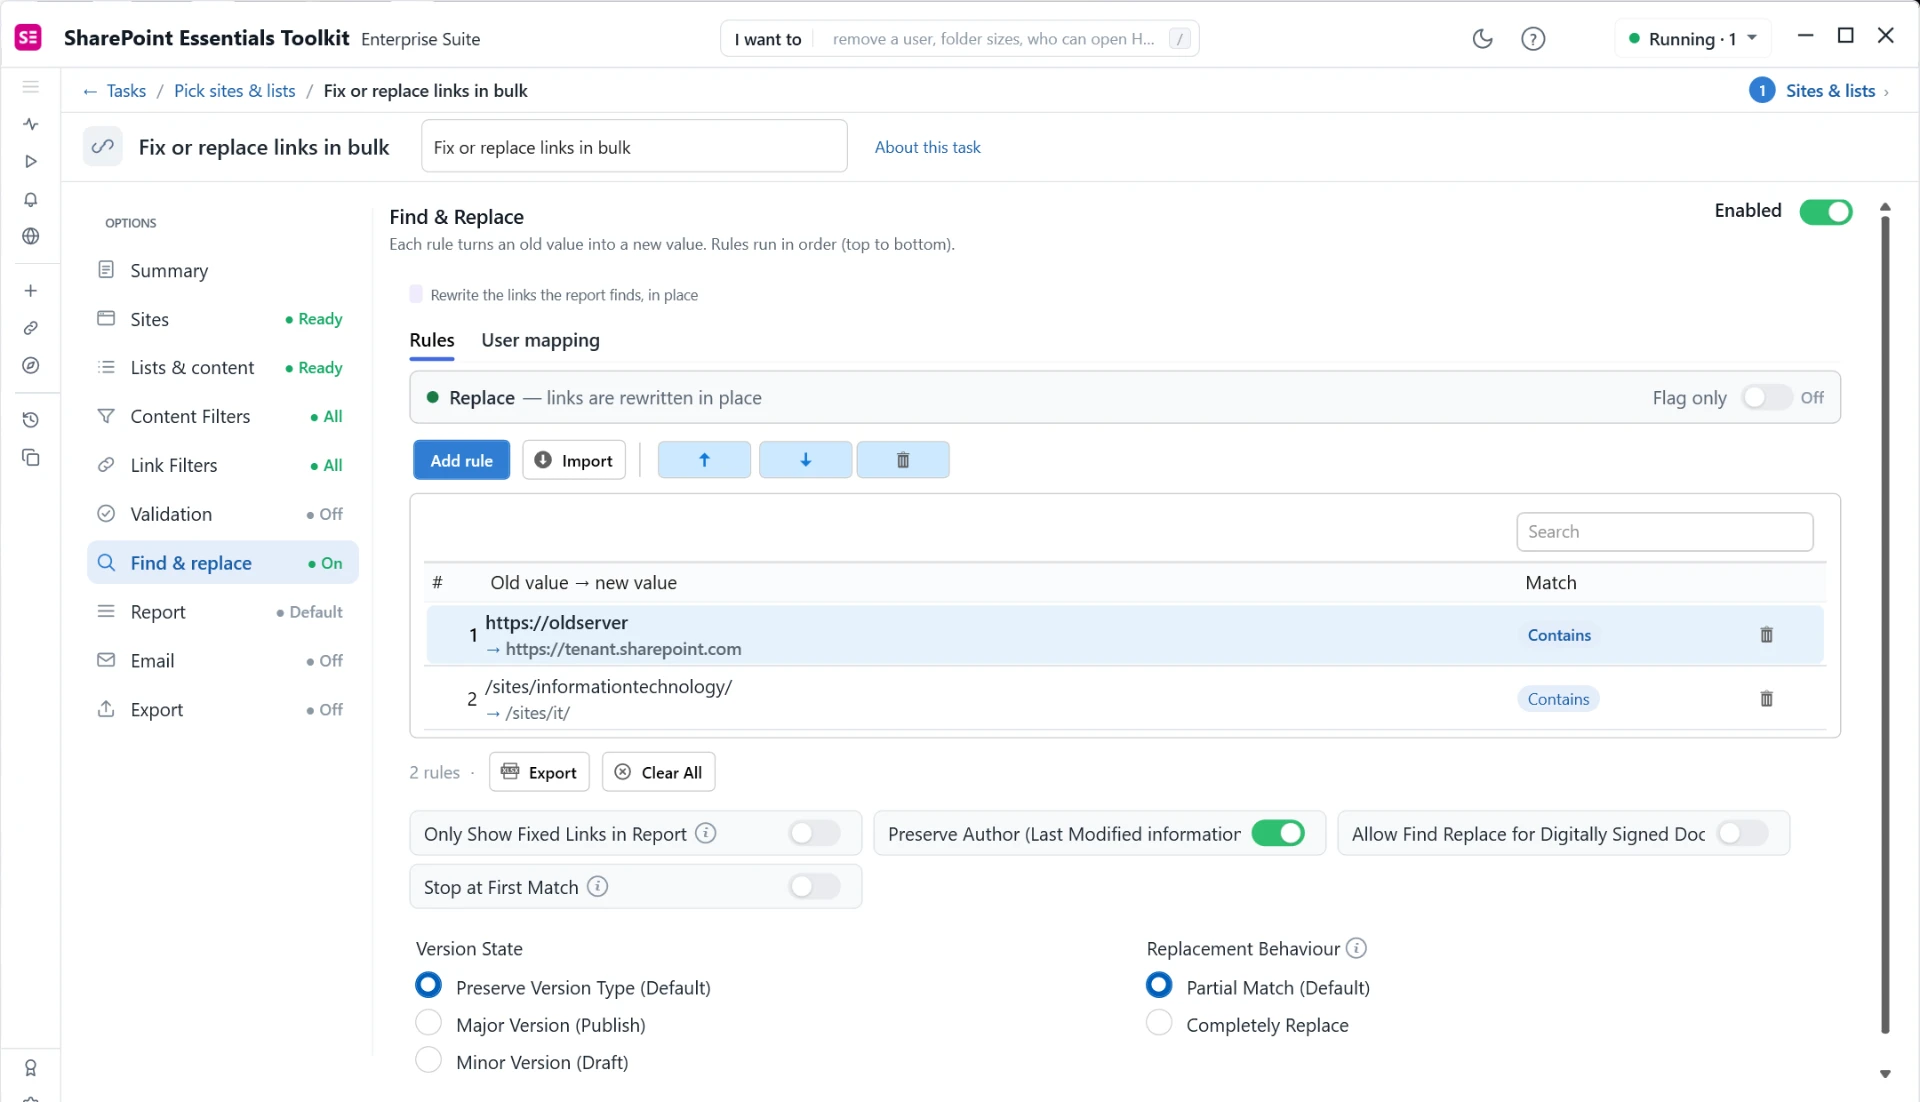
Figure 5c. Two rules in the right order: the host first, then the site path. Select a rule to move it with the arrows. Export saves the rules to Excel. Preserve Author, Version State, and Replacement Behavior are below the list.
Order when a subsite moves somewhere else
Do not do this. The shorter HR rule runs first and rewrites the subsite URL before the last rule can see it.
Old value | New value |
|---|---|
https://oldserver | https://tenant.sharepoint.com |
/sites/humanresources/ | /sites/hr/ |
/sites/humanresources/subsitetomove/ | /sites/newsubsitelocation/ |
Do this. The longer path is above the shorter path. The host stays at the top.
Old value | New value |
|---|---|
https://oldserver | https://tenant.sharepoint.com |
/sites/humanresources/subsitetomove/ | /sites/newsubsitelocation/ |
/sites/humanresources/ | /sites/hr/ |
Rule of thumb
More slashes, higher in the list. The exception is the host rule, which stays at the top. Turn on Stop at First Match when a URL must be changed by only one rule.
Match type and how much of the URL is replaced
Each rule has its own match type. The default, Contains with Partial match, is the right choice for a host or a path prefix.
Match type is chosen per rule, in the editor. Replacement Behavior is not. It is one setting for the whole job, below the rules list: Partial Match (default) or Completely Replace. If some rules need Partial Match (a host or a path) and others need Completely Replace (a wildcard that swaps the whole URL), run them as two separate jobs.
Match type | Use it when | Replacement |
|---|---|---|
Contains | You know the exact text, such as a host or a folder path. | Partial match (default) replaces only that text. Completely replace swaps the entire URL for New Value. |
Wildcard | Part of the URL changes, such as a document ID or a GUID. Use * for the part that varies. | Usually Completely replace, so the whole URL becomes New Value. |
Regular expression | You need .NET regex, including capture groups ($1, $2) in New Value. | Partial match or completely replace, depending on the pattern. |
Wildcard example. Every Document ID link under the old HR site should point at one new library:
Old value: *contoso.sharepoint.com/sites/hr/_layouts/15/DocIdRedir.aspx?ID=*
New value: https://contoso.sharepoint.com/sites/new-hr/Documents
Match type: Wildcard. Replacement Behavior for the job: Completely Replace.
The toolkit matches the encoded and the decoded form of a URL, so a space and %20 are the same rule. For patterns beyond a single star, use the help article How to Use Wildcard & Regex in Link Find & Replace.
Import the rules from Excel
Select Import on the Rules tab and choose an .xlsx workbook. A header row is optional. If the first row looks like a header, it is skipped. The columns are:
Column | Required | Contents |
|---|---|---|
A | Yes | Old value |
B | Yes | New value |
C | No | Match type: Contains, Wildcard, or Regular Expression. If the column is missing, every rule is Contains. |
A two-column file still works. Add column C only when some rules are wildcards or regular expressions.
Export, under the rules list, saves the current rules to Excel. Use it to review the rules with a colleague or to reuse them in another job.
6. Preview with Flag Only
For the first run, turn on Flag only in the bar above the rules. The bar changes from Replace (links are rewritten in place) to Flag only (report what would change, change nothing). The job finds every match and shows the new URL in the report. It does not change SharePoint. You can also turn Flag only on or off from the summary.

Figure 6a. The mode bar on the Rules tab with Flag only on.
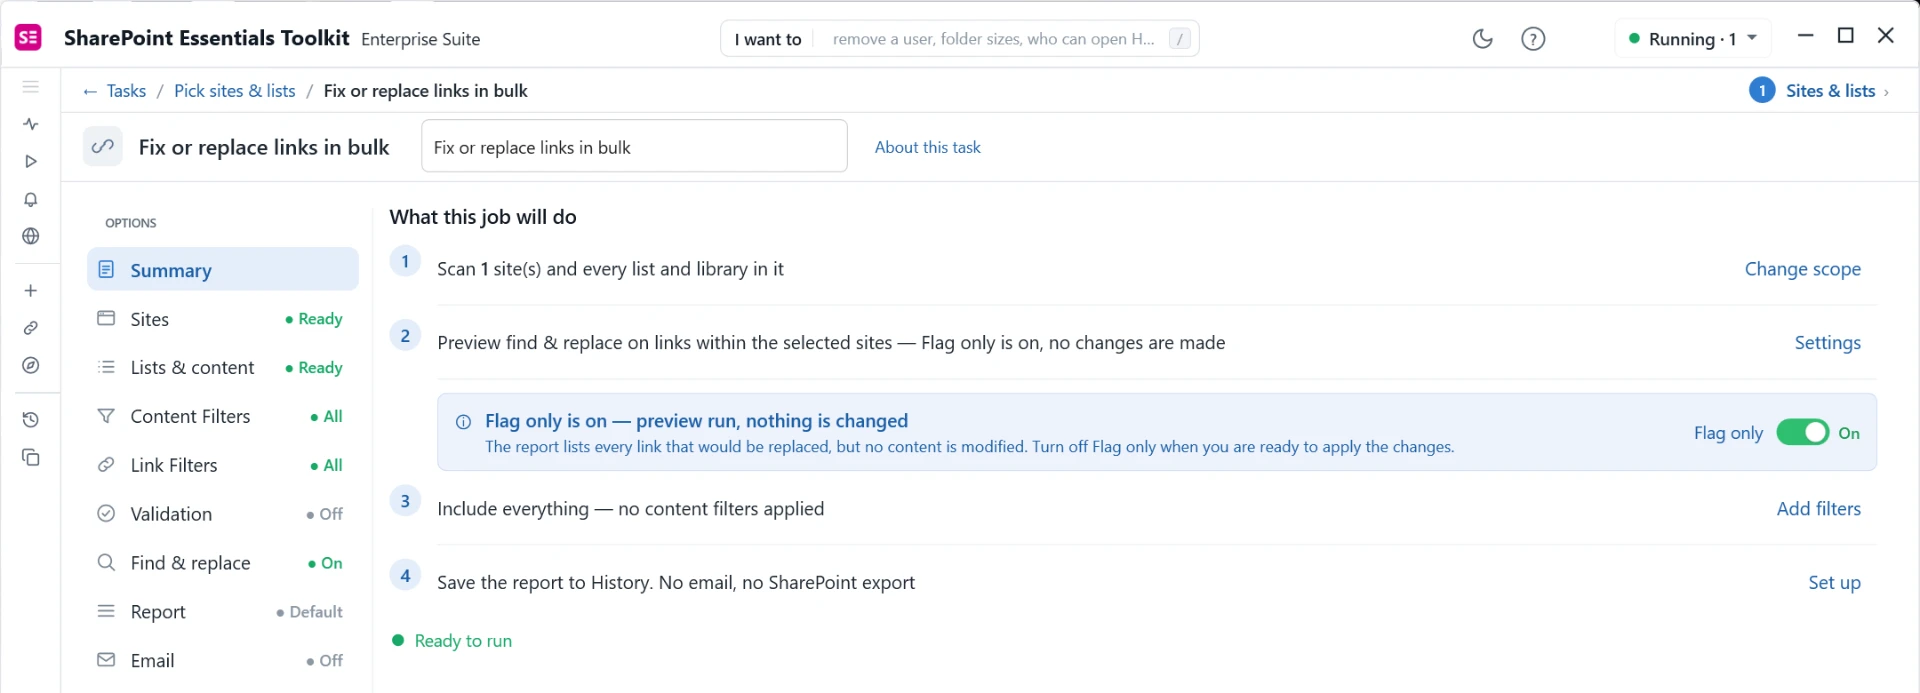
Figure 6b. With Flag only on, the summary confirms a preview run where nothing is changed.
Read the report. In the column set for find and replace, compare the current URL with the preview. If a relative link was missed, or a short rule rewrote a longer path, fix the list and run Flag Only again. Turn Flag Only off only when the preview is the URL you want people to open.
Only Show Fixed Links in Report, if you use it, hides rows that did not match a rule. Leave it off on a preview if you still want to see links the rules missed.
7. Keep the original Modified By
Preserve Author (Last Modified information) is a switch below the rules list on the Rules tab, and it is on by default. Leave it on when the files should still show the person and the date from before the job. Turn it off when it is acceptable for Modified By to become the account that ran the toolkit.
Preserve Author needs Full Control or Site Collection Administrator on the site. With only Edit, the replacement can still run if Preserve Author is off.
Preserve Author needs the original account to still exist. If the person who created or last modified a file has left and the account was deleted, or the account was not migrated, SharePoint reports that the user cannot be found. The new URL is saved, but the original Created By or Modified By cannot be written back, and the row shows the error in the report and in Logs. User mapping, below, fixes this.
The toolkit keeps an audit of the edit. On a library with both major and minor versions, SharePoint will not publish a file as a different user. The account that ran the job publishes the change, and the toolkit then creates a draft that shows the previous Modified By person and date. Readers of the published version see the account that ran the job until that draft is published.
Allow Find Replace for Digitally Signed Documents is off by default. Leave it off unless you have agreed to update signed files. Updating a signed file breaks the signature.
Version state defaults to Preserve Version Type. Leave that default unless you have a reason to force a different version.
How Preserve Author changes version history
Preserve Author retains the previous Modified By person and Modified date and time, but it does not hide that Find & Replace changed the content. SharePoint version history keeps an audit trail of the replacement and adds an entry to restore the original last-modified information.
The screenshots below are the version-history examples from the 2026 guide. They show the SharePoint history, not the 2027 task settings. In these examples, James Smith is the original author and Sandra Brooks is the account running the toolkit. The illustrated version numbers and timestamps are examples, not the version numbers every job will create.
Major versions only
The original entry is version 1.0, attributed to James Smith. Find & Replace creates version 2.0 under Sandra Brooks, recording that one link was replaced. The toolkit then adds version 3.0 with James Smith and the original modified timestamp. The replacement remains in the content, while the history records both the edit and the restored last-modified information.
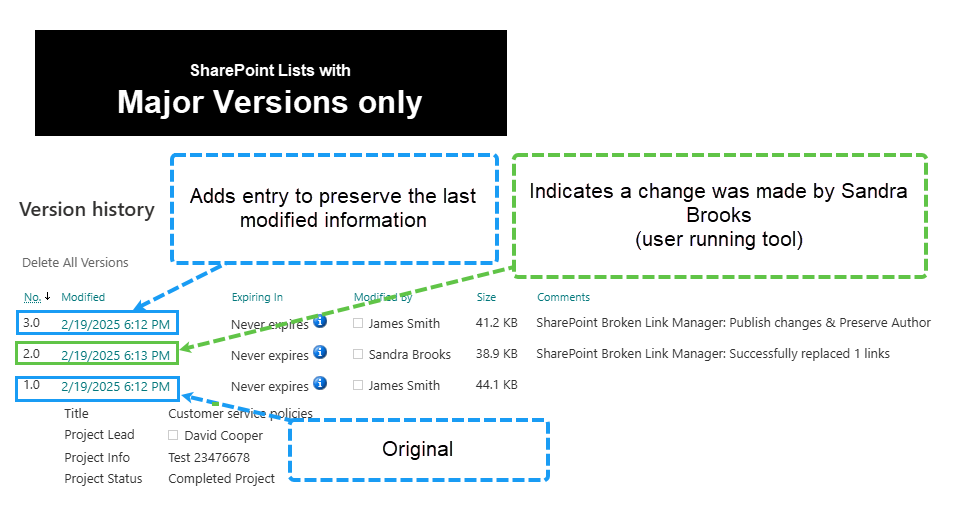
Major versions only: the replacement is recorded under the account running the toolkit, followed by an entry that preserves the previous author and modified timestamp.
Major and minor versions: the document is a draft
The original draft is version 0.1 under James Smith. The replacement is saved as 0.2 under Sandra Brooks. Preserve Author adds draft 0.3, restoring James Smith and the original modified timestamp. The document stays a draft in this example.
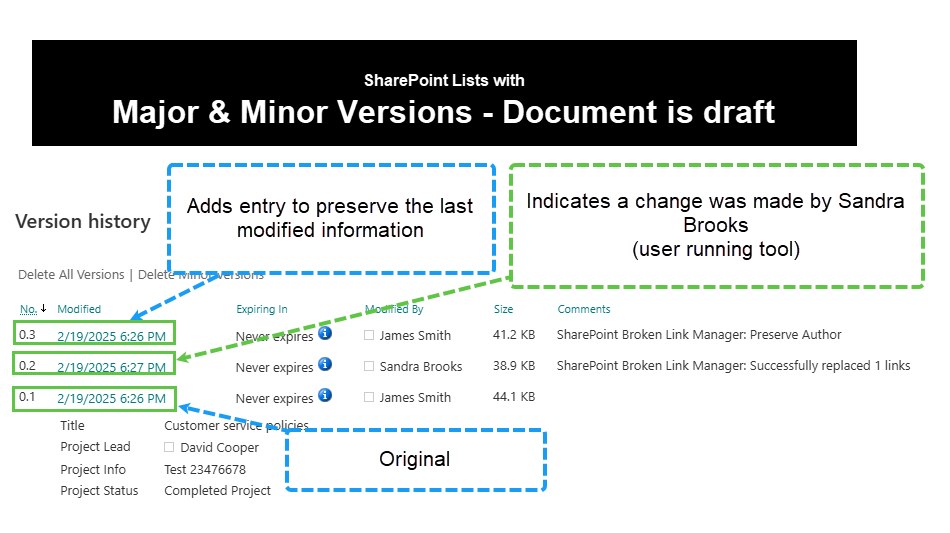
Draft document: the edit and the author-preservation entry are both visible as minor versions.
Major and minor versions: the document is published
The original published version is 1.0 under James Smith. The replacement is recorded as 1.1 under Sandra Brooks, and the changed document is published as 2.0 under that same account. Preserve Author then adds draft 2.1, restoring James Smith and the original modified timestamp.
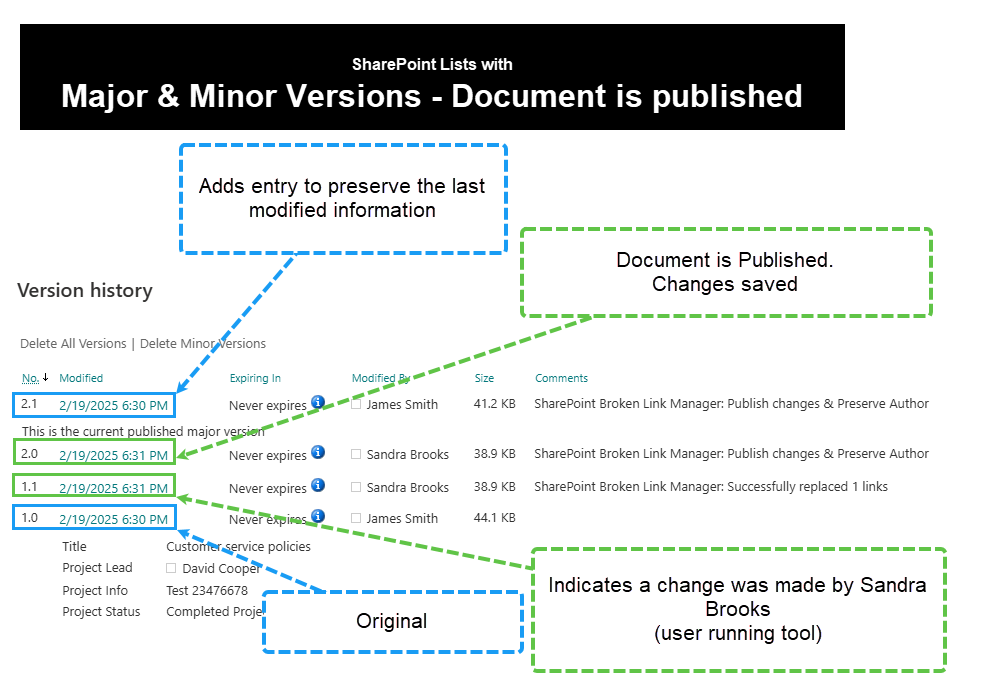
Published document: version 2.0 remains the current published major version; draft 2.1 carries the preserved author and modified timestamp.
Important: SharePoint cannot publish a document as a different user. In a library with major and minor versions enabled, the final author-preservation entry is therefore a draft. The published version records the account that ran Find & Replace. This is separate from content approval; the content-approval limitation described earlier still applies.
Map users who no longer exist (User mapping)
User mapping tells Preserve Author which account to write when the original one is gone. It is the second tab on the Find & replace page, next to Rules. The tab shows a count once you add mappings.
Open the User mapping tab and select Add mapping. A new row appears.
In Old user or group (name, login or email), type the account that no longer exists. Use the email or login when you know it, for example jane.doe@contoso.com or CONTOSO\jdoe. A display name such as Robert Patel also works.
In Write this account instead (email or login), type an active account on the site, for example the person's manager, the content owner, or a service account.
Repeat for each missing account. Select × at the end of a row to remove it, or Clear all to remove every row.
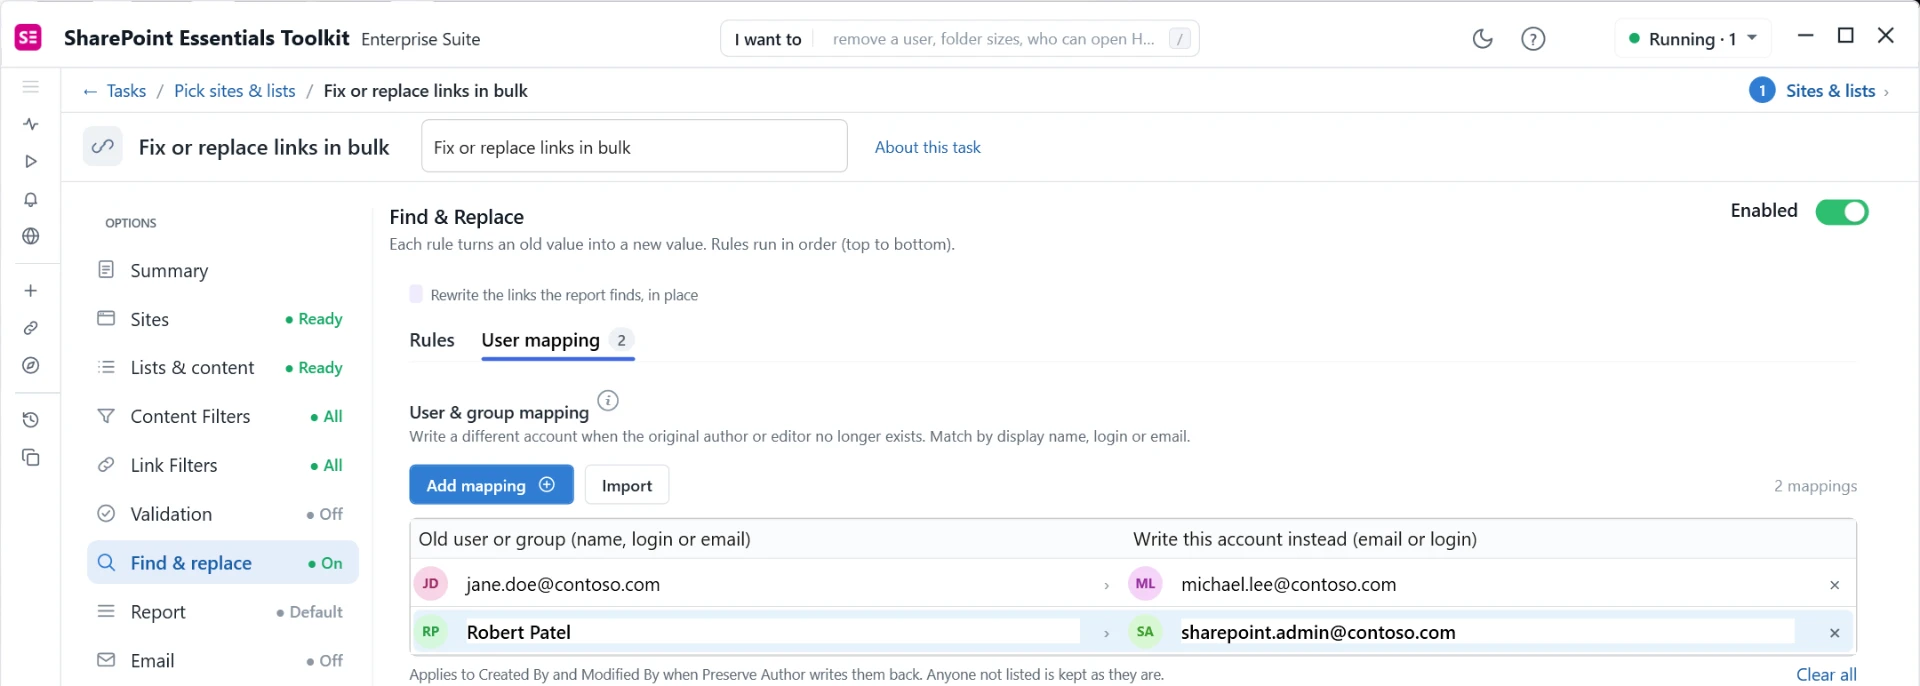
Figure 7a. User & group mapping with two rows. When Created By or Modified By matches the left column, the account on the right is written instead. Anyone not listed is kept as they are.
To add many mappings at once, select Import and choose an Excel (.xlsx or .xls) or CSV file. Column A is the old user or group. Column B is the account to write instead. A header row is skipped automatically. Rows that are empty, or whose old value is already in the table, are skipped. A message shows how many were imported.
How mappings are matched:
Case is ignored. The toolkit checks the original account's login first, then the email, then the display name. A claims login such as i:0#.f|membership|jane.doe@contoso.com also matches jane.doe@contoso.com.
A mapping applies to every replaced item whose Created By or Modified By matches, even if that account still exists. List only the accounts you want replaced.
Display names are not unique. If two people share a name, map by email or login.
The account on the right must be a user SharePoint can resolve on the site. If it cannot be found, that item reports the same user-cannot-be-found error.
User mapping changes only Created By and Modified By when Preserve Author writes them back. It does not change other person columns, and it does not affect the URL rules.
Mappings are saved with the job, so Save as template, Run again, and Duplicate keep them.
Mappings are used only while Preserve Author is on. If you turn Preserve Author off, the User mapping tab shows a warning and the mappings are ignored.
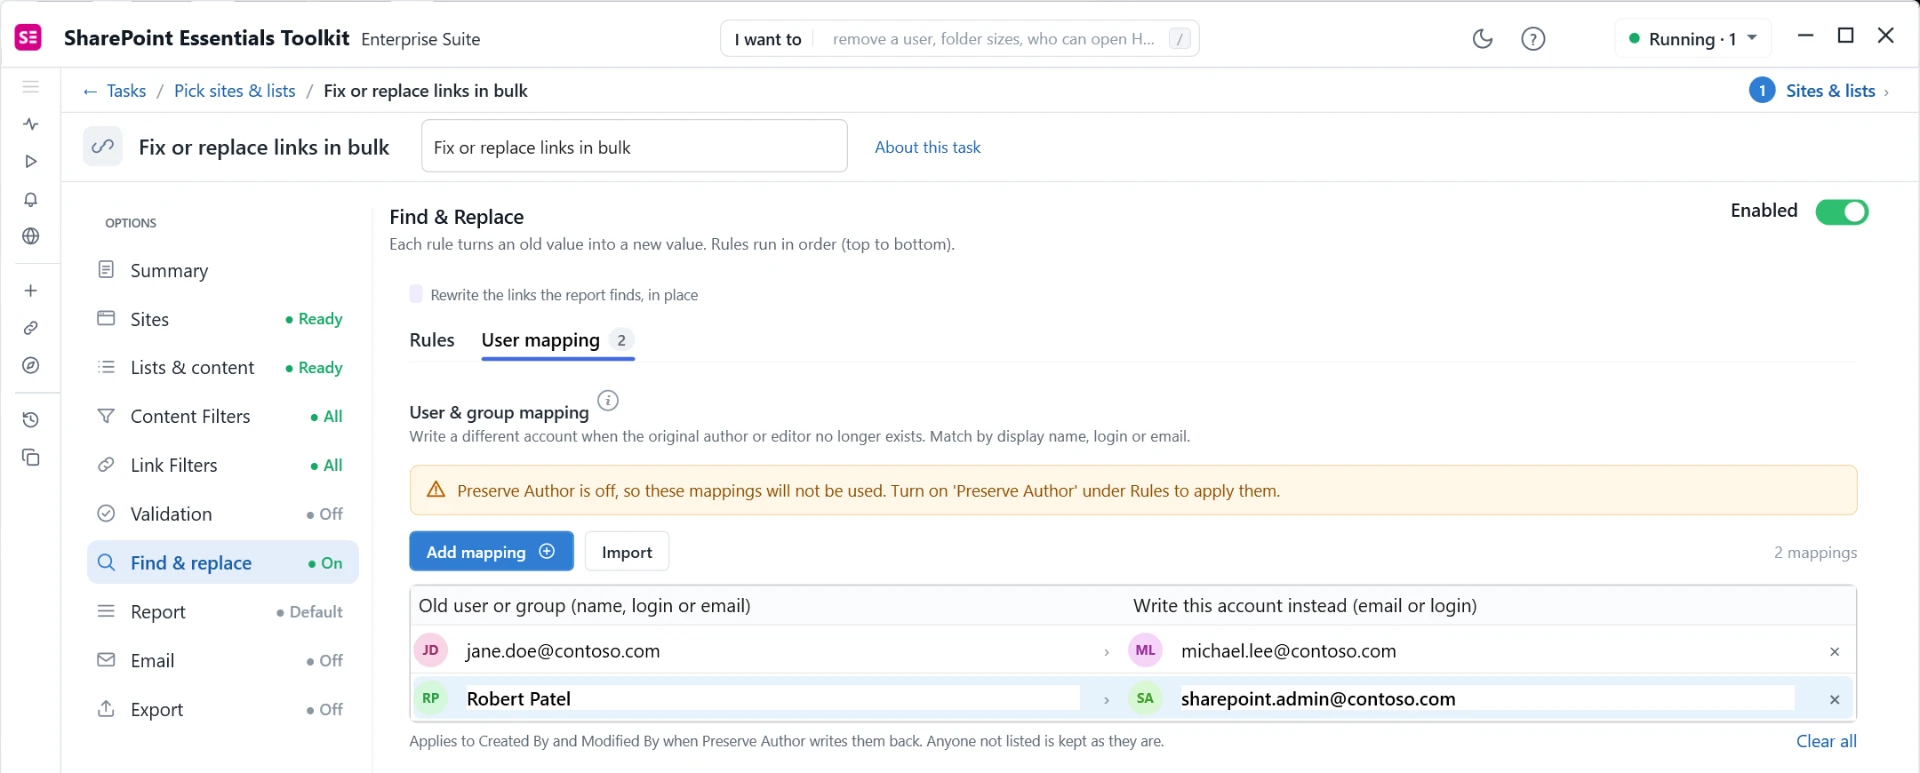
Figure 7b. With Preserve Author off, the User mapping tab warns that the mappings will not be used.
8. Run the job and read the report
Select Run Now. Schedule saves the same options to Windows Task Scheduler. Save as template keeps the rules for the next site. The toolkit does not have to be open for a scheduled job, but the computer must be on and able to reach SharePoint. For SharePoint Online, a scheduled job should use a certificate connection, because a browser sign-in expires.
The report opens while the job runs. The header shows progress. Edit Options returns to the summary. Run Now starts another pass.
A link job produces two reports. The links report is one row per URL, with where it was found. The link summary is one row per page, item, or file, with a count of links and of links replaced.
Use the Columns button to switch sets. For a link job the sets are Essentials, Validation, Find & replace, and Item details. The Find & replace set is the one to use after a Flag Only run and after a real update.
Right-click a row to test the link in the browser, open it in SharePoint, open the properties page, or open the parent folder or list. The same actions work on every ticked row. Opening many rows asks you to confirm, because each one is a browser tab.
Open Logs if rows failed. A checked-out file, a missing permission, or a deleted author (when User mapping was not set) is listed there. Job details shows the options the run actually used.
Every run is stored in History. Open the row to see the report again. Run again repeats it. Edit settings or Duplicate starts a new job from those options without changing the historical row. A History row itself is not edited, so the audit trail stays what ran.
If the run stopped early, History offers Resume. Resume drops the sites and lists that finished and targets what failed or never started. To rerun a chosen set of files instead, export the URLs you care about and add a content filter from a file, using the help article How to run a job for only failed or specific items. That article still shows the previous job-options screen. In 2027 the same filter is Add filters on the summary page.
9. Make the next run faster
Skip the status check when you only need the replacement. Testing every URL is the slow part. The performance guide estimates a 30 to 60 percent shorter job with validation off. For Fix or replace links in bulk, validation is already off: the Validation page shows Validate links off, and the job only finds and replaces links. Turn it on only if you also want the report to show which links are broken. Use Link inventory when you only want the list.
Do the small sites first. Put them in one site group and run that group. Give a library with hundreds of thousands of files its own job, and use a folder or date filter to split it.
Turn off detailed logging unless you are working with support. It is off by default.
Leave the file size limit unless you know large files contain the links. The default is 20 MB (Lists & content, Skip files larger than).
The article How to Make Jobs Finish Faster describes the same ideas using the previous Home page and Live Explorer. In this release, group the sites on Tasks and use Explorer when you need to see which libraries are large.
10. Watch for new broken links
After the replacement, run Find broken links on the same sites, or turn the link job into a monitor so it runs on a schedule and emails you when new broken links appear.
Open Monitoring, then New monitor.
Choose a broken-links monitor, or Any task and pick the link task or a template you saved.
Choose the site group. Leave Skip system libraries and site assets on.
Choose weekly, or daily, and the time.
Turn on the alert for something new that was not in the previous run, add the recipients, name the monitor, leave Run once now selected, and select Start monitor.
The Dashboard card opens the latest run. Monitors use the same sign-in as scheduled jobs, so SharePoint Online monitors should use a certificate connection.
What gets updated, and what does not
The full list is in What Type of Links Will Be Processed? This is the short version for a replacement job.
Updated
Modern pages, including web part properties and SPFx web parts.
Classic pages in page libraries, except the two web parts below. Classic pages at the site root (Site root pages) are reported but not replaced.
Navigation: top nav, Quick Launch, cascading menus, and mega menus.
List and library columns that can hold a URL, and list item attachments.
File contents: Word (including macros and links on pictures), Excel (data connections, Power Query, macros, and cells and formulas when Excel cell links and Excel formula links are on), PowerPoint, Visio, OneNote, PDF (including plain-text links and www addresses), text, HTML, XML, JSON, CSS, JavaScript, ASPX, and MHT.
http, https, ftp, mailto, other URI schemes, UNC paths, mapped drives, sharing links, Document ID links, and durable links (Copy link). Mailto addresses are reported as valid. The toolkit does not check that the mailbox exists.
Links that are plain text rather than a clickable hyperlink, in Word, Excel, PowerPoint, PDF, and HTML. A text URL that contains a space can be cut short, because there is no reliable end to the URL.
Not updated
Script Editor web parts and Summary Links web parts on classic pages.
Custom classic web parts that do not store the URL the way a SharePoint web part does. The 2019 release is the one documented for broader classic web part replacement. Modern SPFx web parts are in scope for 2027.
The Copy Source column. It is sealed. It appears in the report and can be validated. It cannot be replaced.
Links that start or end with #, Word bookmarks, external lists, and calendar overlays.
SharePoint’s own layout links (appredirect.aspx, userdisp.aspx, spsdisco.aspx, and similar) are skipped by the default exclusion rules. Remove the rule if you need them included.
Inside zip, Illustrator, Photoshop, AutoCAD, and Outlook (.msg, .eml) files. Metadata on those items is still scanned.
Content approval state. A replaced file in a library that requires approval can remain Pending. See Documents or Pages Not Published After Find Replace with Content Approval Enabled.
Related articles
These are on the Cognillo help site. Where an article is still written for the 2026 screens, use this guide for where to click and that article for the rule or the limit.
Article | Use it for |
|---|---|
The full supported and unsupported list. Applies to 2026 and 2027. | |
Relative URLs and rule order, with the same examples as section 5. | |
Wildcard and regular expression examples, and column C on the Excel import. | |
Documents or Pages Not Published After Find Replace with Content Approval Enabled | Content approval. States that the 2027 release does not preserve the approved state. |
Validation, grouping, logging, and the 20 MB file limit. The click path is the previous layout. | |
Retry a chosen set of files with a content filter. The screens are the previous layout. In 2027, also use History, Resume. | |
Quick Setup Guide: Run Your First Permissions Report in 5 Minutes | License, connection, and adding sites on a new 2027 installation. |
A short checklist
Small site, Flag Only on, rules added (not only typed).
Host rule first. Longer paths above shorter paths.
Relative URLs covered, not only https:// addresses.
Preserve Author matches the permission you have. User mapping filled in if the old accounts are gone.
Excel cell links and Excel formula links turned on if workbooks hold links that way.
Checked-out files and content approval planned for.
Flag Only off, then Run Now.
Find & replace column set reviewed. Failures read in Logs.
Find broken links, or a weekly monitor, after the update.
Need help? Contact support@cognillo.com.