How to Report on SharePoint File and Item Metadata (Free, Across Sites and Site Collections)
The easiest way to report on SharePoint metadata is the free SharePoint Essentials Toolkit. Pick your sites and libraries, name the columns you care about, and it lists every file and item with those column values in one grid, across sites and site collections, ready to export to Excel. Its Content Comparison report also compares the metadata of lists on two sites.
Published:
Last updated: 2026-11-05
What is a SharePoint metadata report?
Metadata is the information stored in a library's or list's columns: a project number, a document type, a client, an owner, a review date. A metadata report lists every file and item with those values, so you can see what's filled in, what's missing and what's wrong. Typical reasons to run one:
- Audits. Show which documents belong to which client or project, or which ones are past their review date.
- Data quality. Find files with a blank Document Type or a project number that doesn't exist.
- Migrations and copies. Check that metadata came across to the new site.
- Search and Copilot. Good metadata makes files easier to find, so a report shows where tagging needs work.
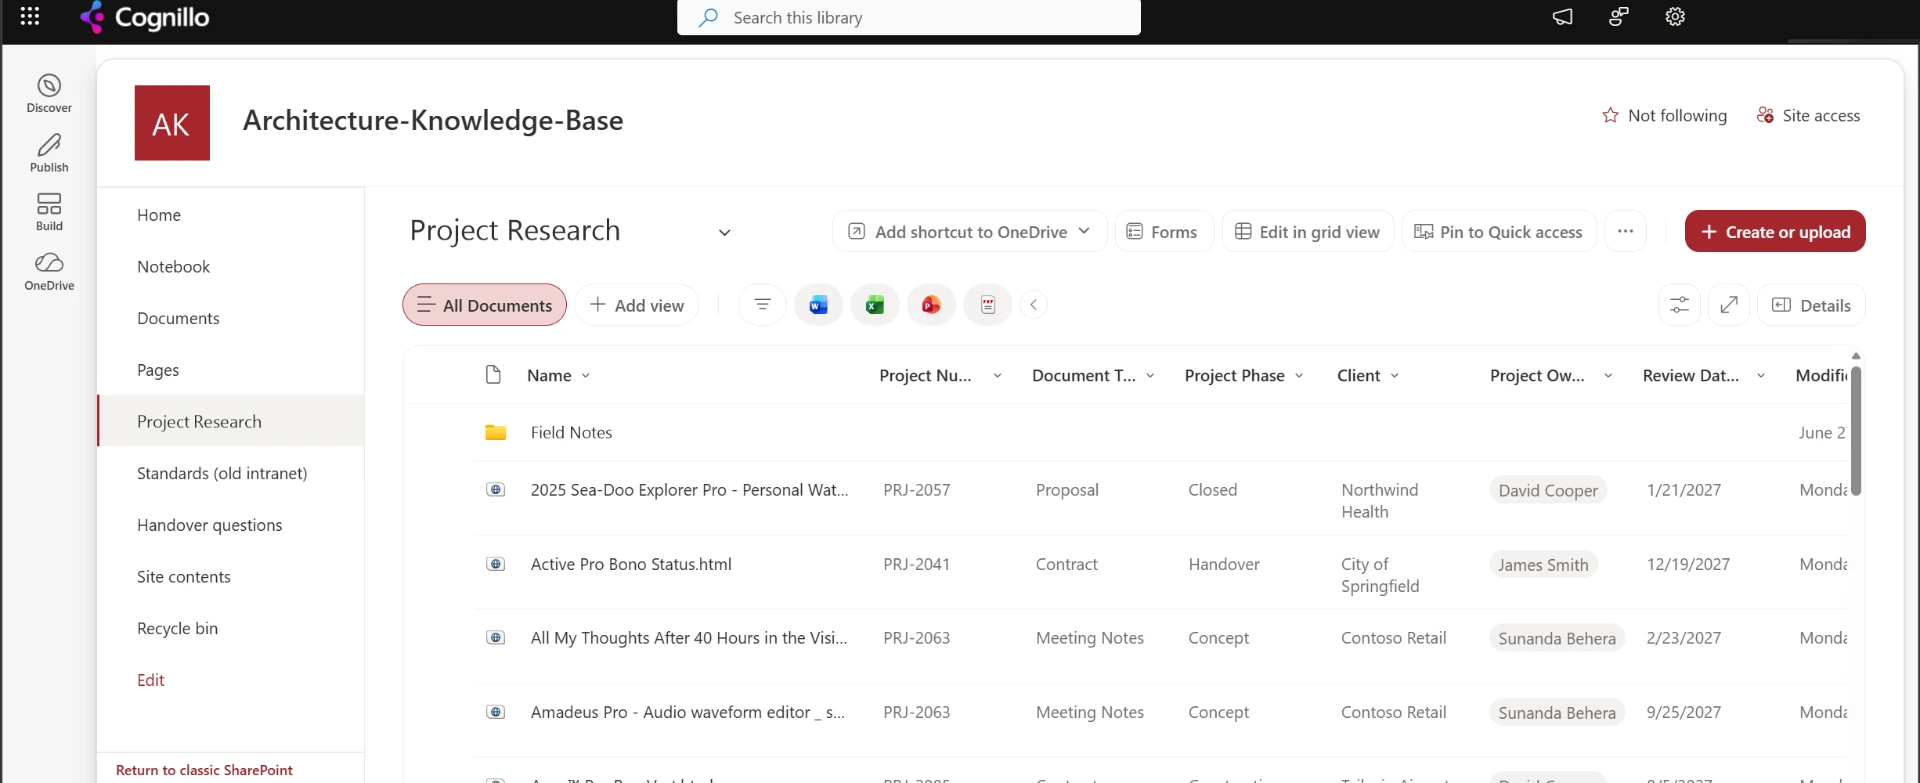
Our test library, Project Research on the Architecture-Knowledge-Base site, has 75 files tagged with six columns: Project Number, Document Type, Project Phase, Client, Project Owner and Review Date. We moved those columns next to Name in the view so they're easy to see.
Option 1: Built-in views and Export to Excel
For one library, SharePoint can show and export metadata on its own.
- Open the library, select any column header, then Column settings > Show/hide columns, and turn on the metadata columns you want. Drag them up the list to move them next to Name, then select Save view as to keep the layout.
- Use the column headers to filter or group, for example group by Client or filter Document Type to blank.
- With no files selected, select Export > Export to Excel.
Microsoft explains the export in Export to Excel from SharePoint or Lists.
What to know:
- Excel opens a web query (
query.iqy) of the current view. Columns that aren't in the view, and files the view filters out, are left out. - Lists can also Export to CSV, up to 30,000 rows. Microsoft says document libraries don't offer CSV export.
- Each export covers one list or library. There's no built-in report across libraries, sites or site collections.
- To compare two libraries you have to export both and match the rows yourself in Excel.
Option 2: Report on SharePoint metadata with PowerShell
PnP PowerShell can read every item in every library of the sites you list and write one CSV. It uses Get-PnPList, Get-PnPField and Get-PnPListItem. Install PnP PowerShell 2.x or later and register your own Entra ID app first.
Use the columns' internal names, which you can see in the address bar when you open a column's settings (for example Field=ProjectNumber). The script reads only; it changes nothing.
# Report file and item metadata from every list and library on several sites into one CSV
$ClientId = "<your-app-id>"
$Sites    = @(
    "https://contoso.sharepoint.com/sites/Research",
    "https://contoso.sharepoint.com/sites/Projects"
)
$Columns  = @("ProjectNumber", "DocumentType", "ProjectPhase", "Client", "ProjectOwner", "ReviewDate")

# Person, lookup, managed metadata and multi-value columns are objects; turn them into text
function Format-Value($value) {
    if ($null -eq $value) { return "" }
    if ($value -is [System.Array]) { return ($value | ForEach-Object { Format-Value $_ }) -join "; " }
    if ($value -is [Microsoft.SharePoint.Client.FieldUserValue]) { return $value.Email }
    if ($value -is [Microsoft.SharePoint.Client.FieldLookupValue]) { return $value.LookupValue }
    if ($value -is [Microsoft.SharePoint.Client.Taxonomy.TaxonomyFieldValue]) { return $value.Label }
    if ($value -is [Microsoft.SharePoint.Client.FieldUrlValue]) { return $value.Url }
    return "$value"
}

$rows = foreach ($site in $Sites) {
    Connect-PnPOnline -Url $site -Interactive -ClientId $ClientId
    $lists = Get-PnPList | Where-Object { -not $_.Hidden -and $_.BaseTemplate -in 100, 101 }
    foreach ($list in $lists) {
        $names   = (Get-PnPField -List $list).InternalName
        $present = @($Columns | Where-Object { $_ -in $names })
        if ($present.Count -eq 0) { continue }
        $fields  = @("FileLeafRef", "FileRef", "FSObjType") + $present
        foreach ($item in Get-PnPListItem -List $list -PageSize 500 -Fields $fields) {
            $v   = $item.FieldValues
            $row = [ordered]@{
                Site   = $site
                List   = $list.Title
                Name   = $v["FileLeafRef"]
                Path   = $v["FileRef"]
                Folder = ($v["FSObjType"] -eq 1)
            }
            foreach ($c in $Columns) {
                $row[$c] = if ($v.ContainsKey($c)) { Format-Value $v[$c] } else { "(no column)" }
            }
            [pscustomobject]$row
        }
    }
}
$rows | Export-Csv -Path ".\sharepoint-metadata-report.csv" -NoTypeInformation -Encoding UTF8
"$($rows.Count) rows written"
To compare two libraries, export each to its own CSV with the script above and compare them by file name:
# Compare the metadata of two exports, matched by file name
$Columns = @("ProjectNumber", "DocumentType", "ProjectPhase", "Client", "ProjectOwner", "ReviewDate")
$source  = Import-Csv ".\research-source.csv"
$target  = @{}
Import-Csv ".\research-target.csv" | ForEach-Object { $target[$_.Name] = $_ }

foreach ($s in $source) {
    $t = $target[$s.Name]
    if (-not $t) { "{0}: missing on target" -f $s.Name; continue }
    foreach ($c in $Columns) {
        if ($s.$c -ne $t.$c) { "{0}: {1} is '{2}' on the source and '{3}' on the target" -f $s.Name, $c, $s.$c, $t.$c }
    }
}
What to know:
- To cover every site collection, build
$Sitesfrom Get-PnPTenantSite, which needs SharePoint admin rights. The script then signs in to each site in turn. - Large libraries take a while, and SharePoint throttles long runs. Keep
-PageSizeat 500 or less. - Columns with the same display name can have different internal names on different sites, so check each site's names.
- Matching by file name breaks when two folders hold files with the same name. Match by the path inside the library instead.
- Test on a small site first.
Option 3: Report on SharePoint metadata free with SharePoint Essentials Toolkit
SharePoint Essentials Toolkit reports the column values of every file, item, folder and page on the sites you pick, in one grid. It works across sites and site collections, and the report only reads. We ran it on three libraries of the Architecture-Knowledge-Base site that share the same six project columns: Project Research, Project Delivery and Handover Documents.
1. Choose the metadata report
Open Tasks, choose the Inventory area, and pick Get inventory of item, files and page labels and metadata. It lists every item with its sensitivity label and the columns you name. (Get inventory of items, files, folders, pages is the same report with more presets, such as documents only or items with a matching value.)

2. Pick sites, libraries and columns
Tick the sites under Pick sites to work with. You can tick sites in different site collections, or a whole site group, in the same job. Under Narrow it to specific lists, tick the libraries and lists to include, or leave it empty to report them all. Then type the columns in SharePoint columns to include, separated by semicolons. Display names and internal names both work.
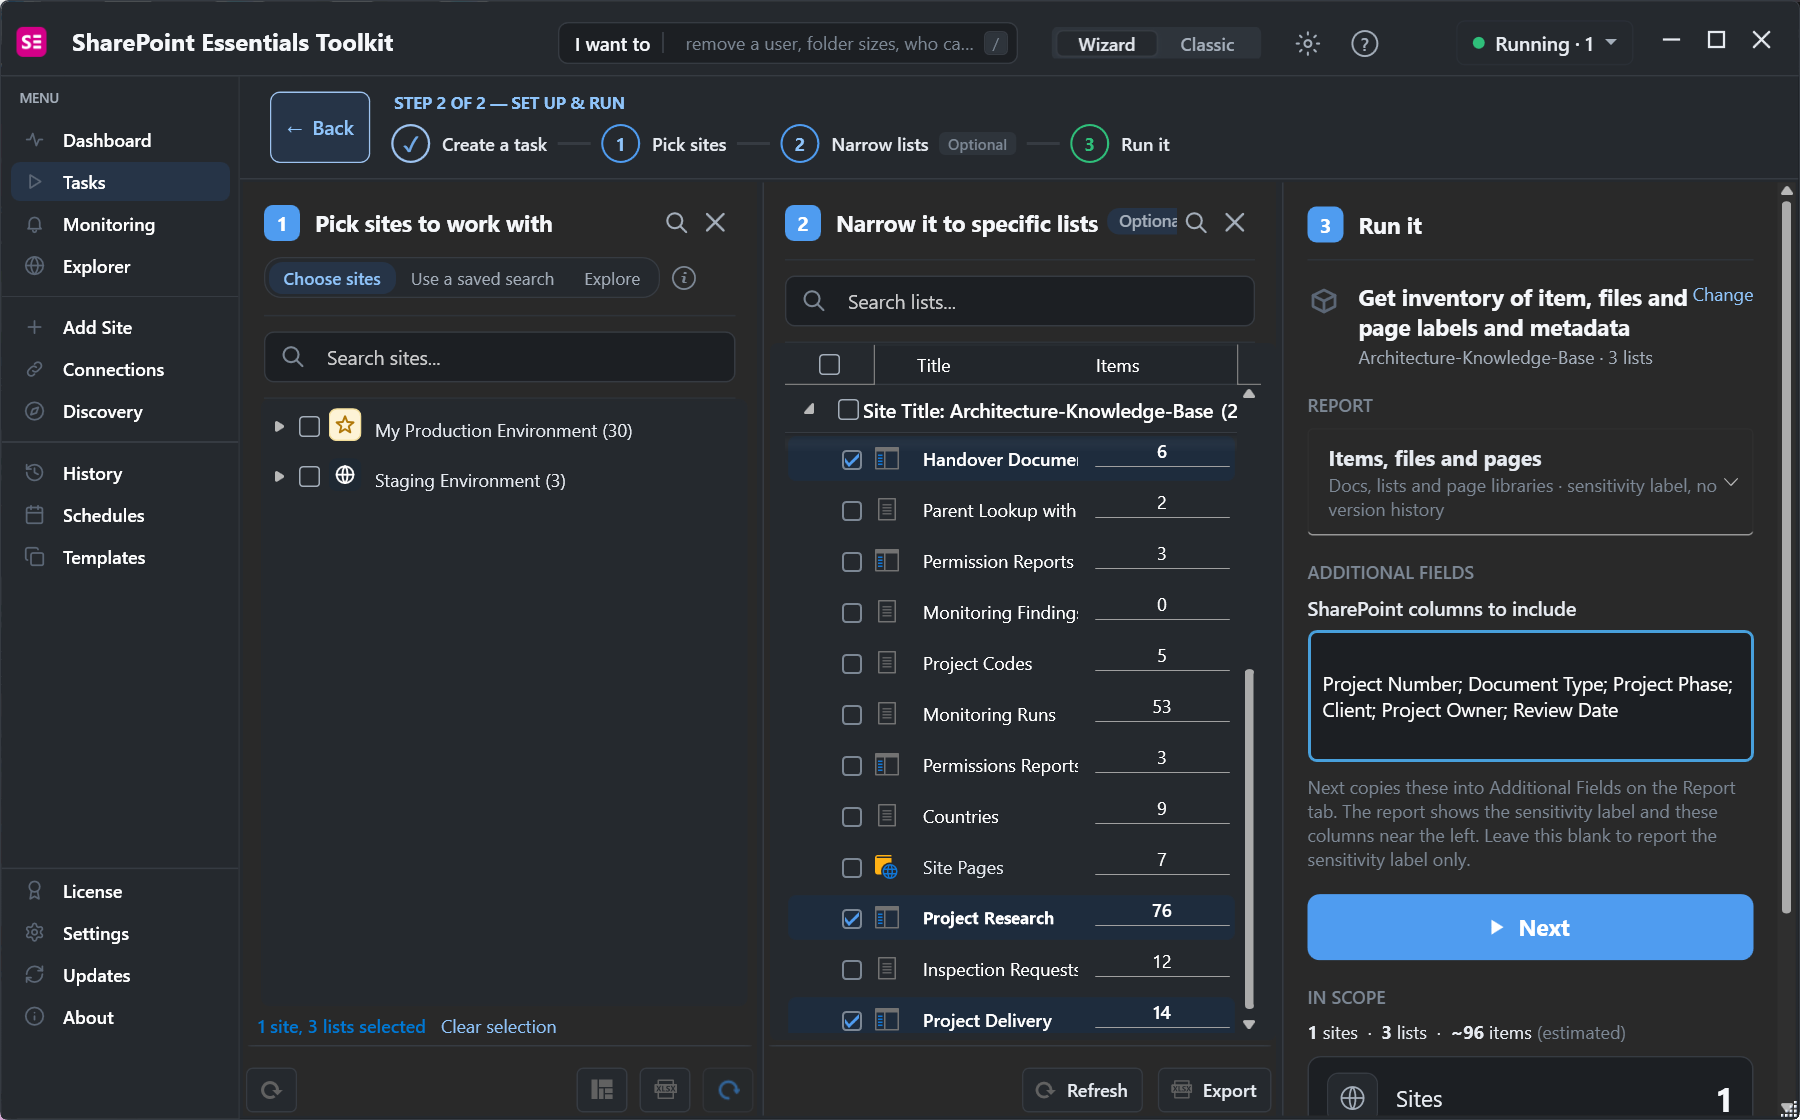
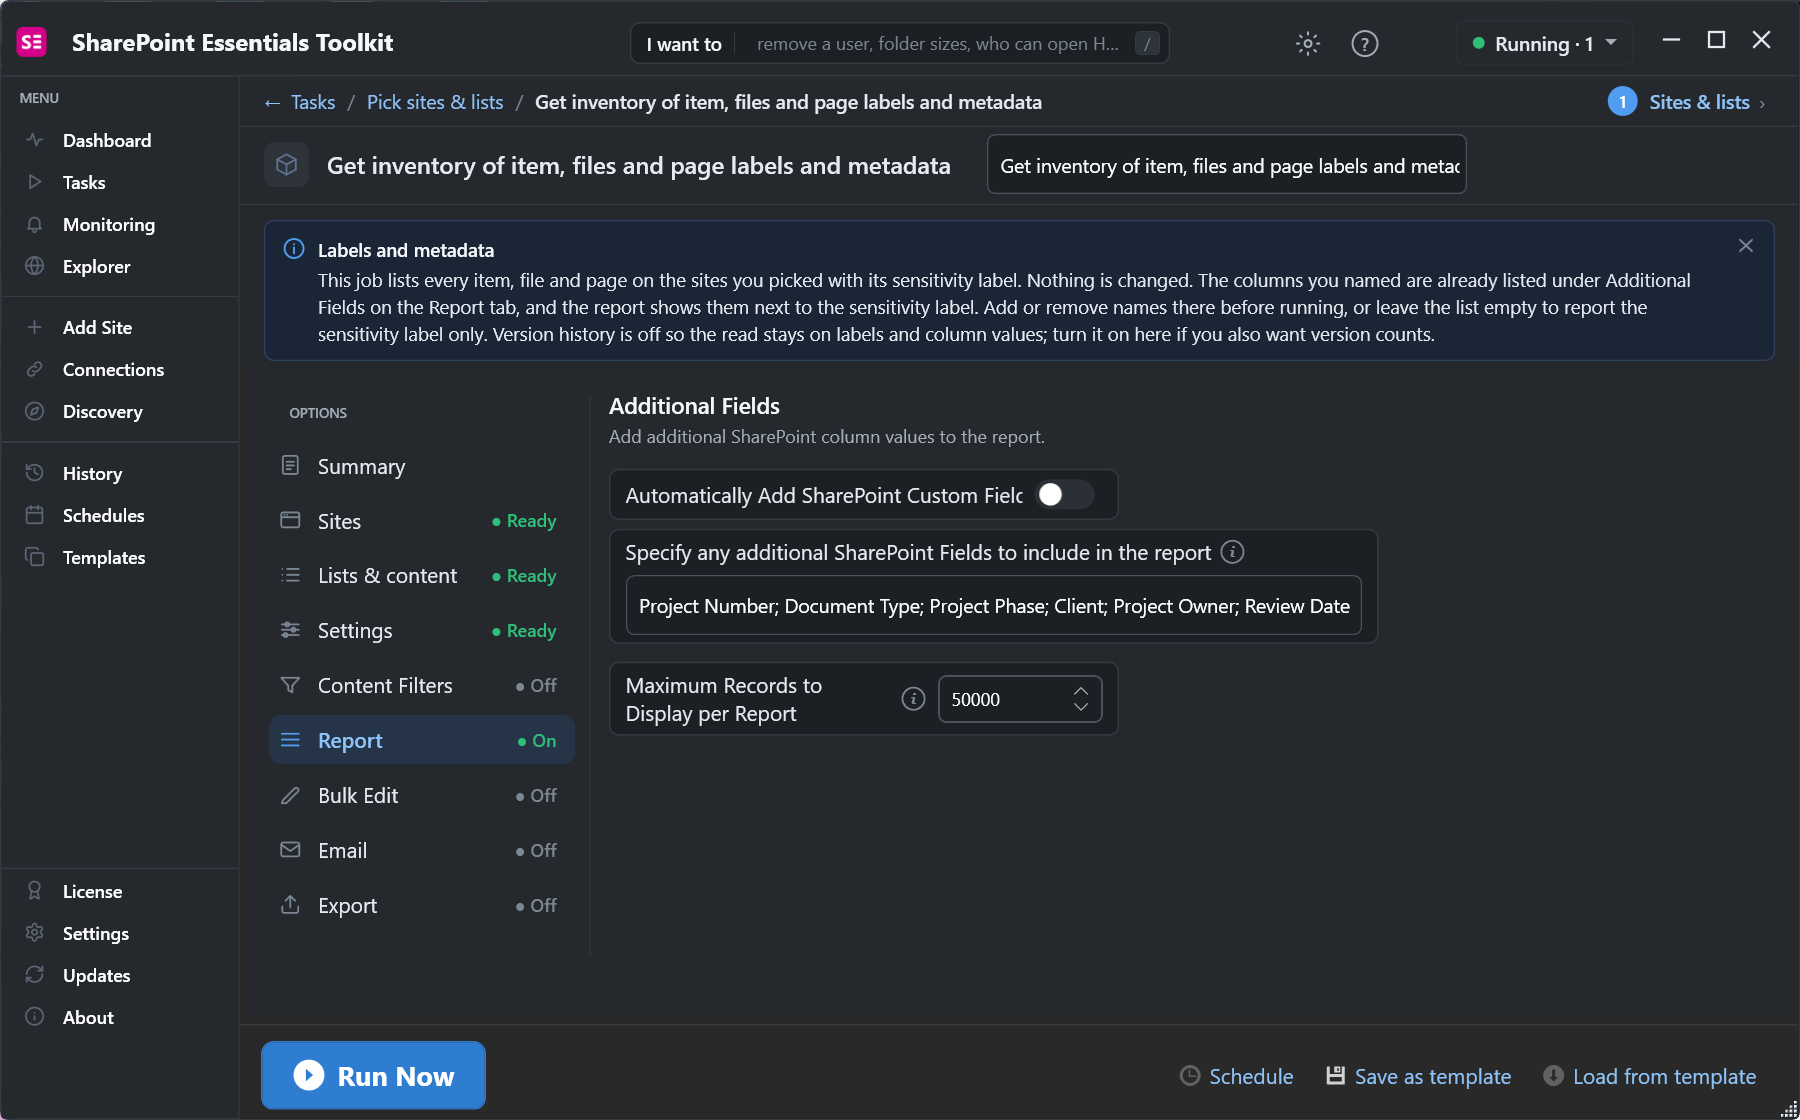
Select Next. The columns are copied to Additional Fields on the Report tab, where you can change them before running. If you'd rather not name them, turn on Automatically Add SharePoint Custom Fields and the report adds every custom column it finds.
3. Run the report
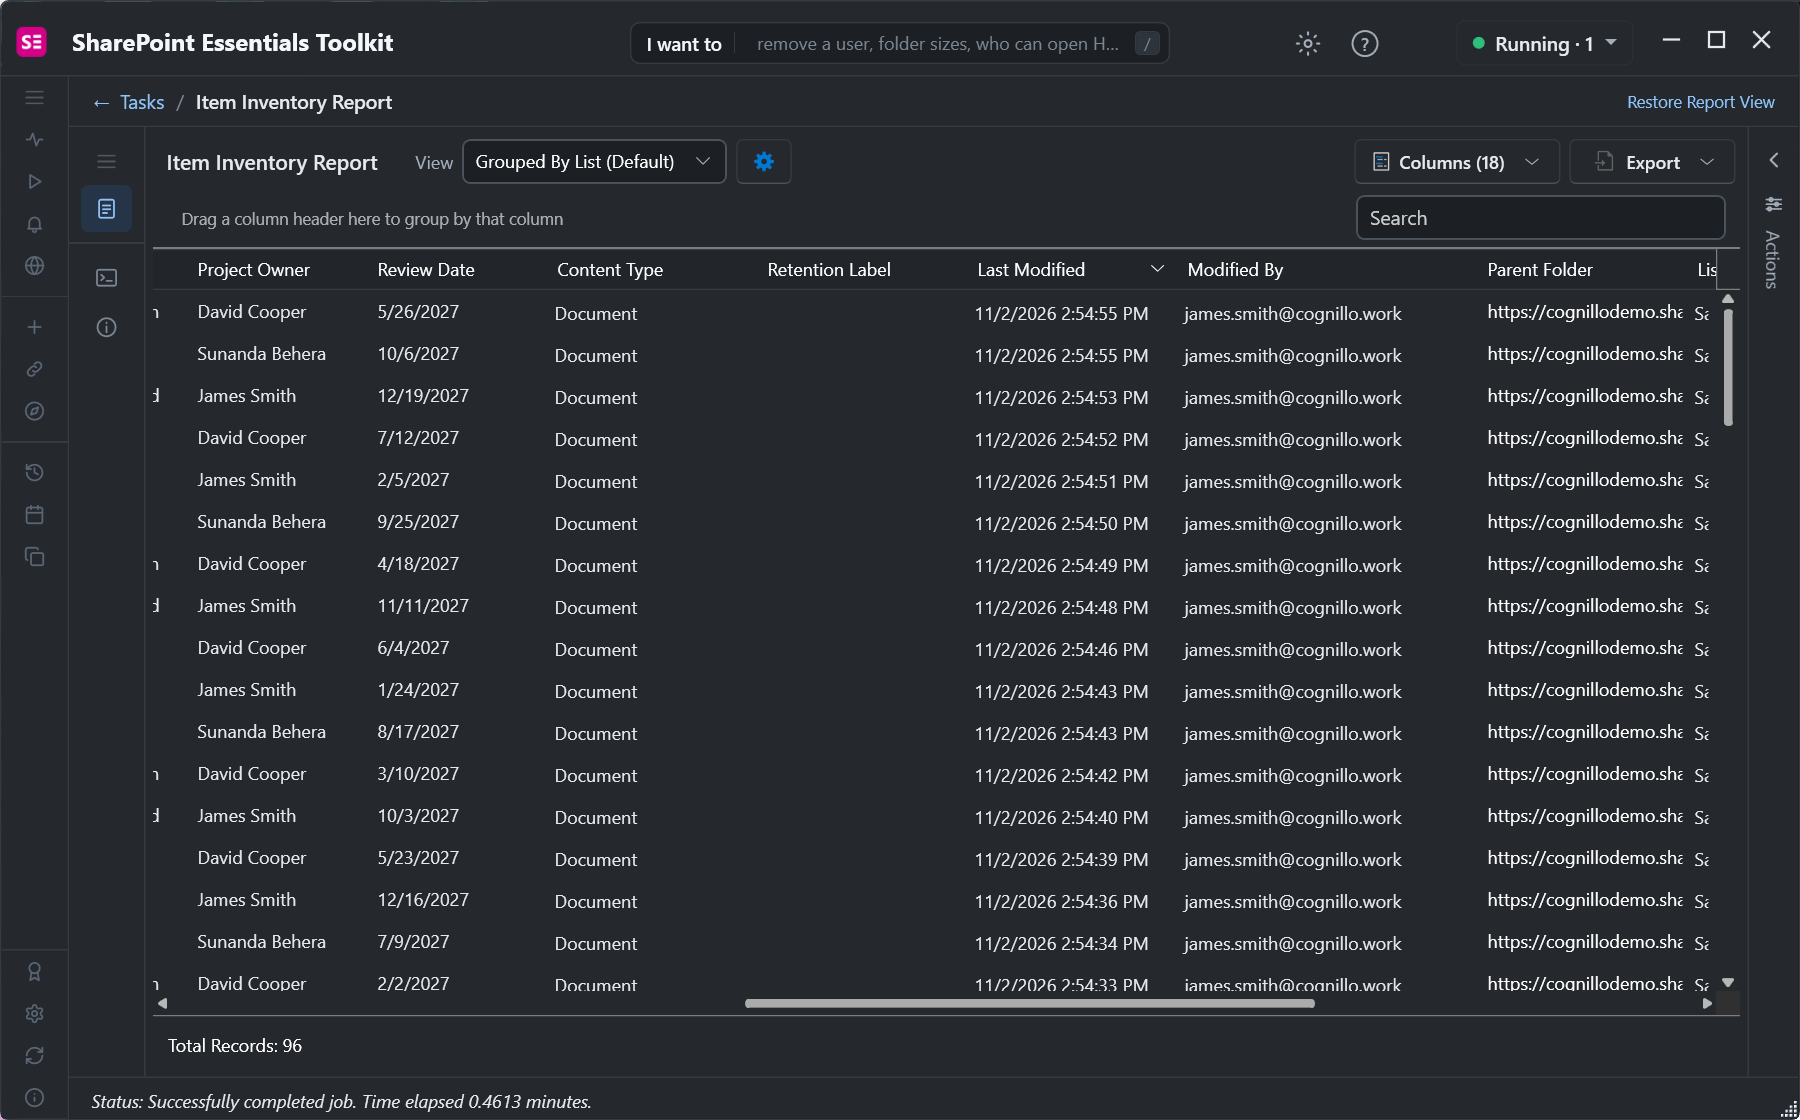
Select Run Now. Our three libraries took 0.46 minutes and returned 96 records: 88 files and 8 folders. The columns we named sit near the left, after the item and its sensitivity label. Drag the List Title header to the grouping bar to see each library on its own, or group by Site Title when the report covers several sites.
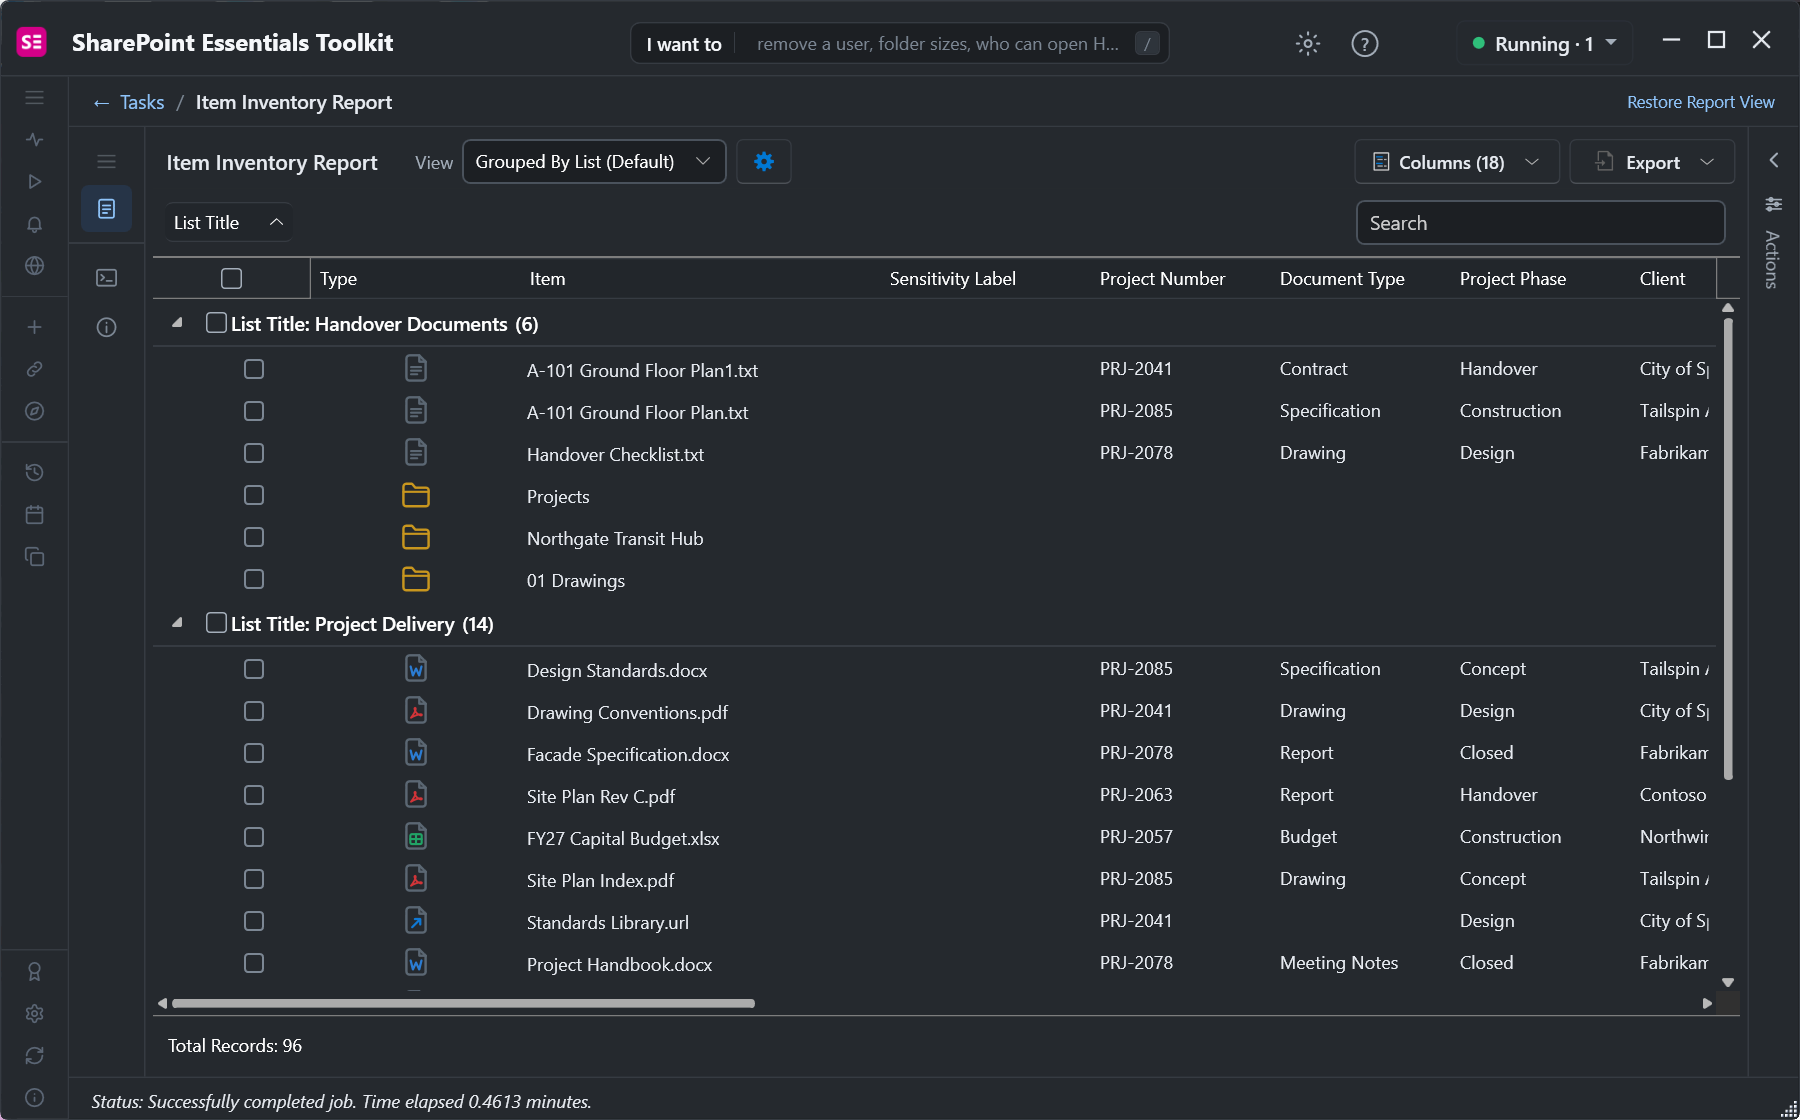
Blank cells stand out at once: several files in Project Delivery and Project Research have no Document Type. Scroll right for Project Owner, Review Date, Content Type, Retention Label, Modified, Modified By, Site Title and the item's URL.
4. Export the metadata to Excel or CSV
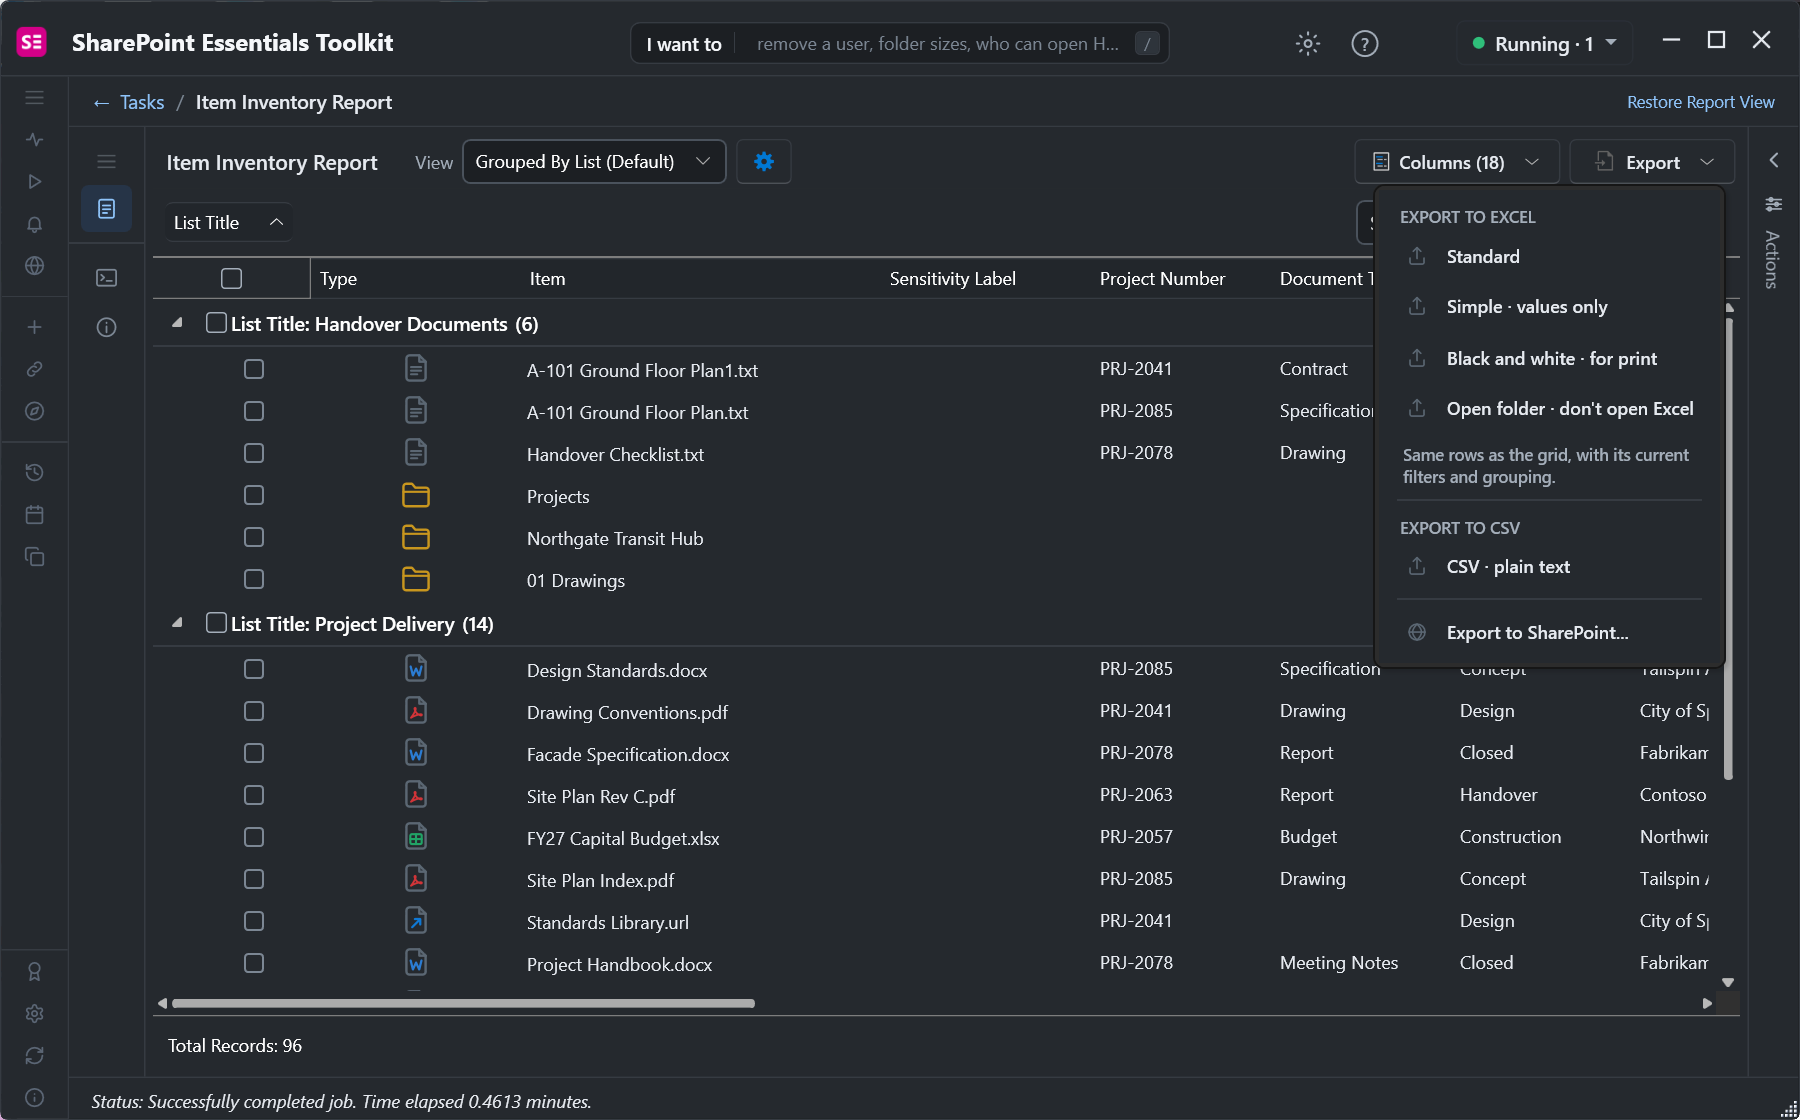
Select Export to save the grid as an Excel workbook (standard, values only, or black and white for print) or as a CSV file. The export keeps the current filters and grouping. Export to SharePoint saves the report to SharePoint instead, so others can open it without the toolkit.
To fix what the report finds, such as filling in a blank Document Type on many files at once, see How to bulk edit SharePoint metadata.
Compare SharePoint metadata between lists with the comparison report
A metadata report tells you what one set of libraries holds. The Content Comparison report tells you how two of them differ. It looks up every file, item and folder of a source list in the matching list on a target site, compares their column values, and marks each one OK, Metadata differs, Missing on target or Only on target. The two sites can be in different site collections, or even different tenants.
The Project Research library was copied to our site from a Boston Team site some time ago, and the six project columns were added afterward, only on our site. We compared the two copies.
1. Pick the source list and the target site
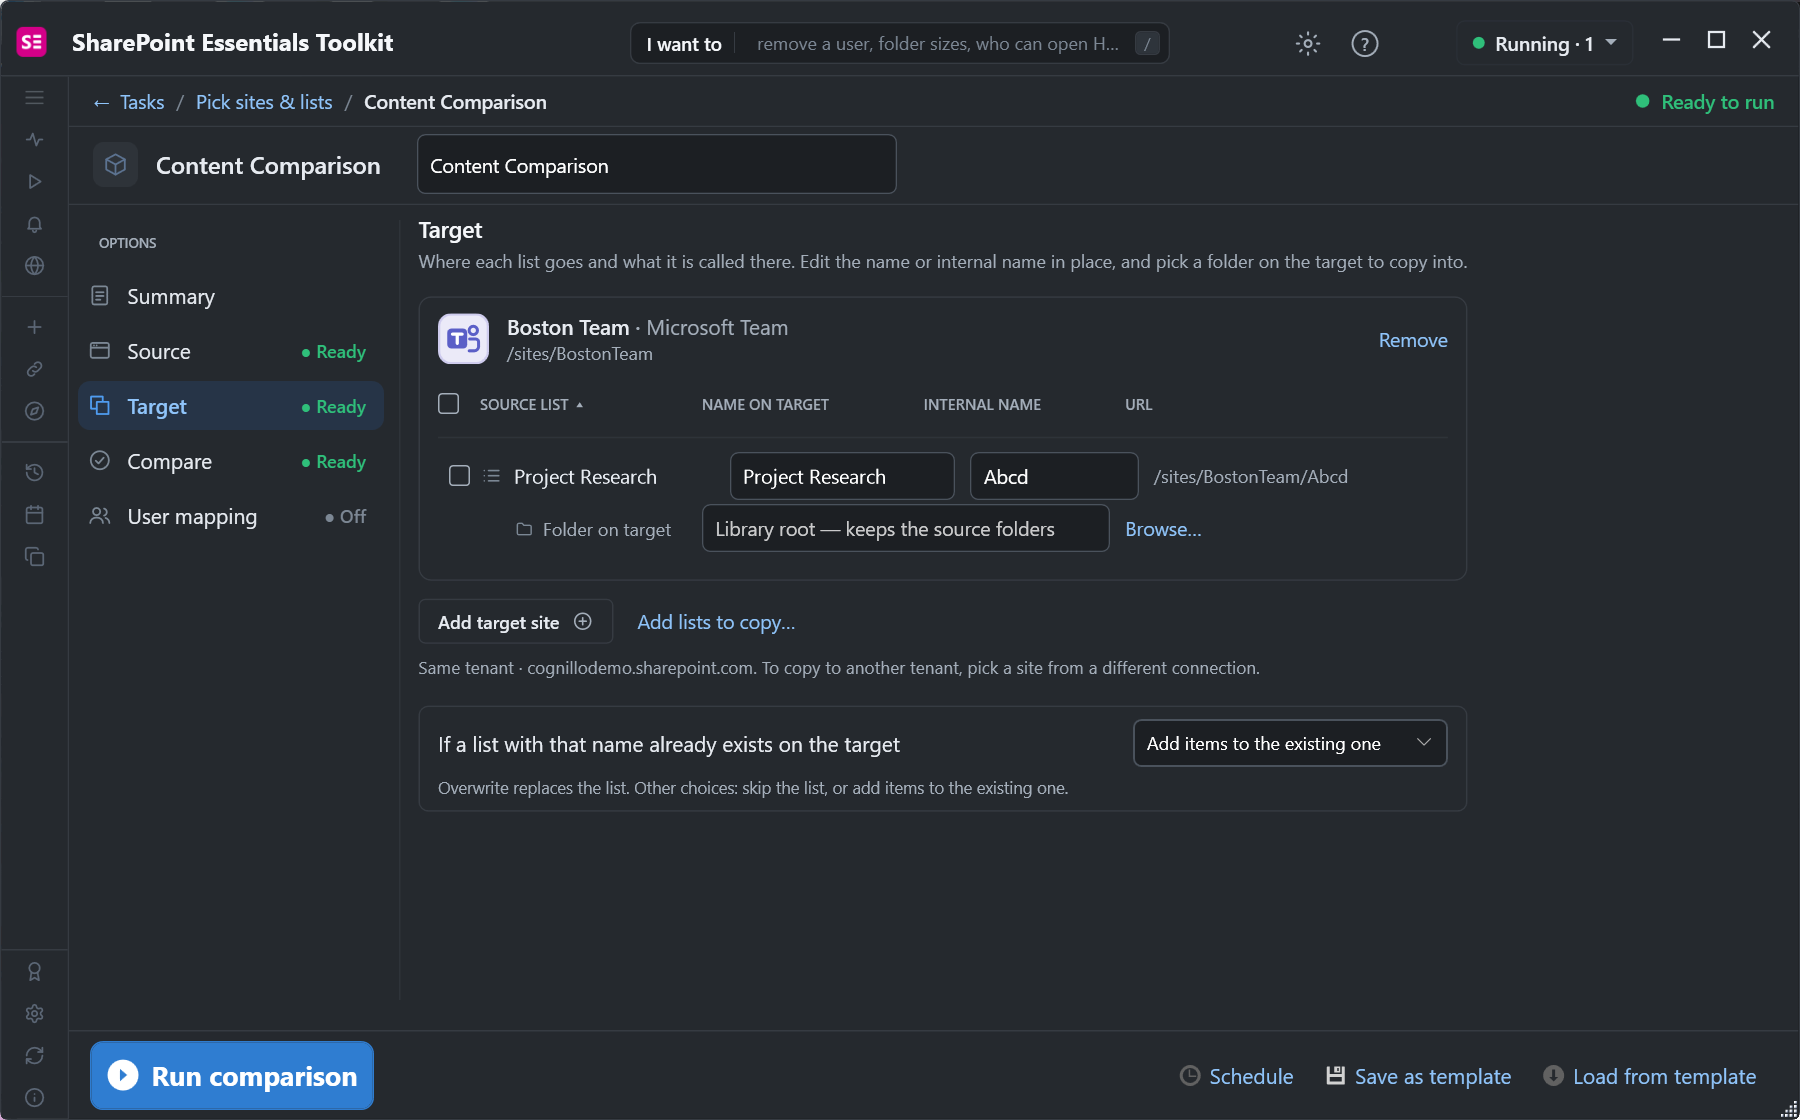
In Tasks > Inventory, pick Get Content Comparison. Tick the source site and narrow it to the list to compare, then select Next: Pick target. Under Target, add the target site. The toolkit matched our library to the one with the same internal name (Abcd) on the Boston Team site, and you can edit the match.
2. Choose what to compare
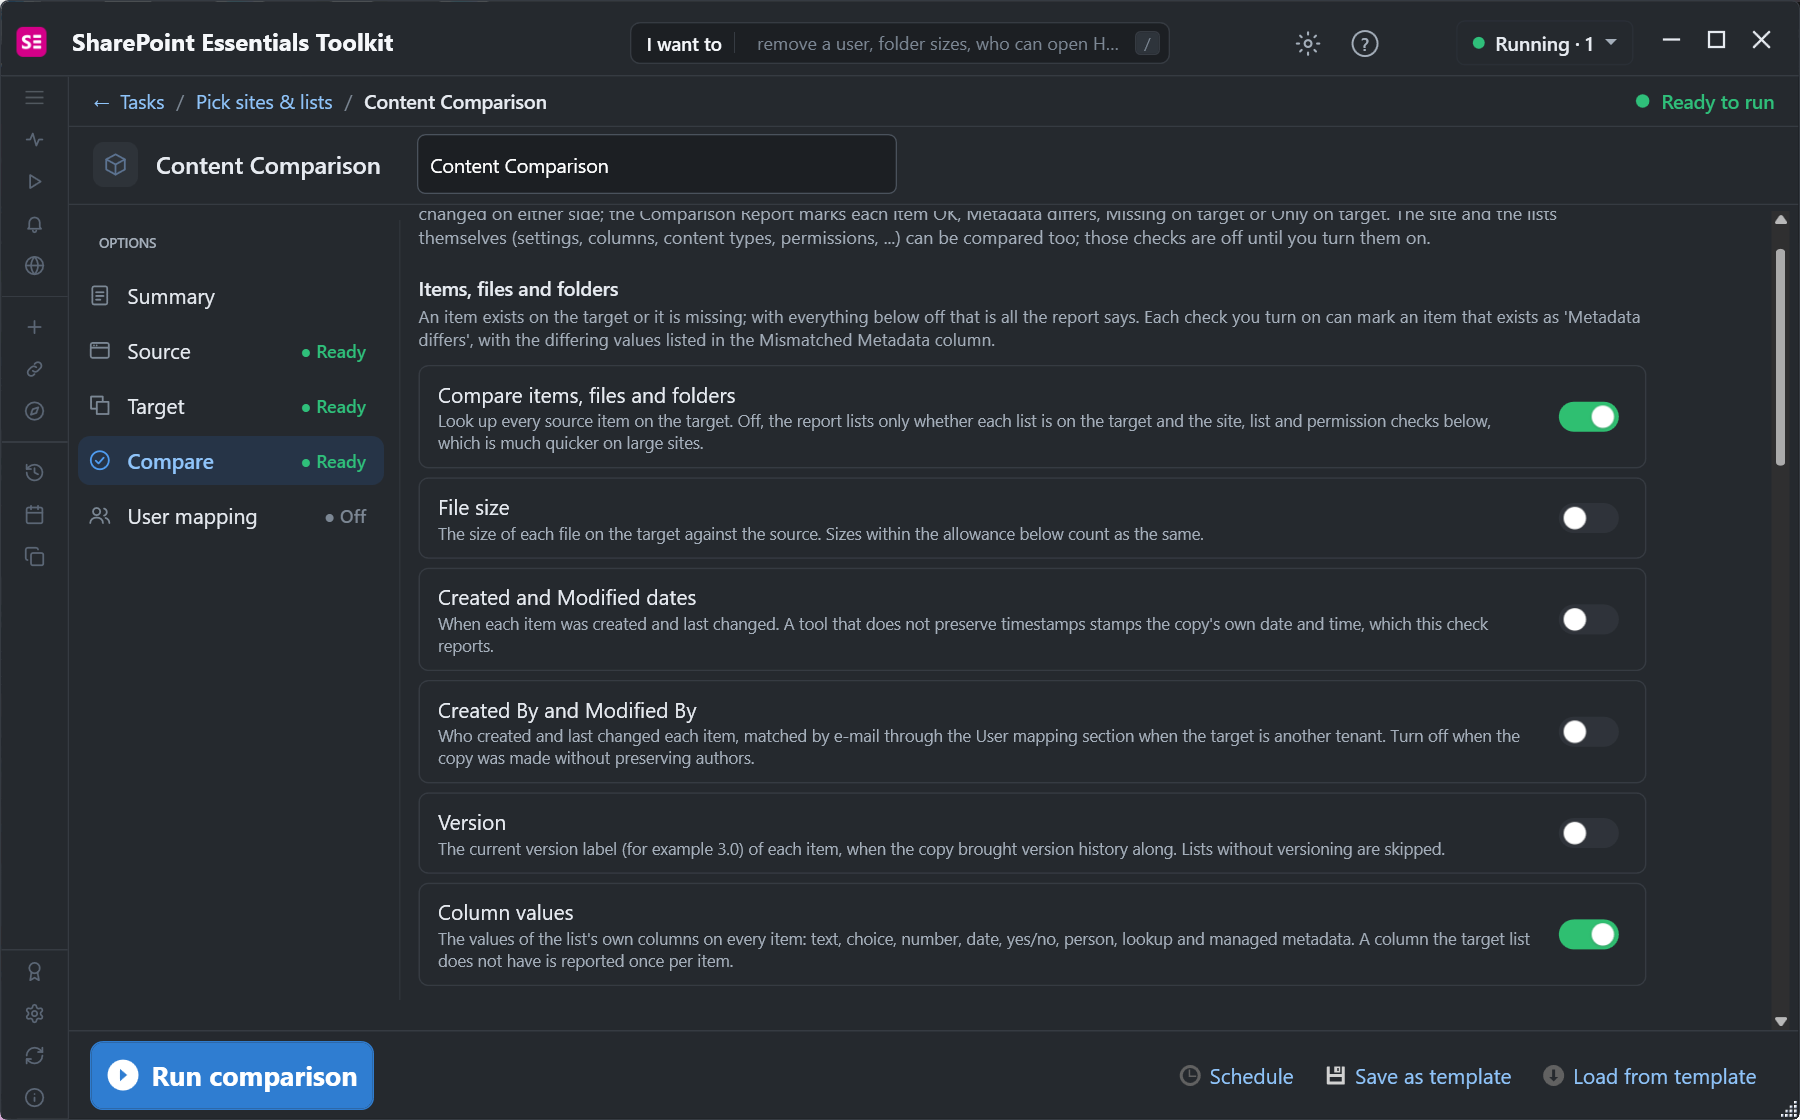
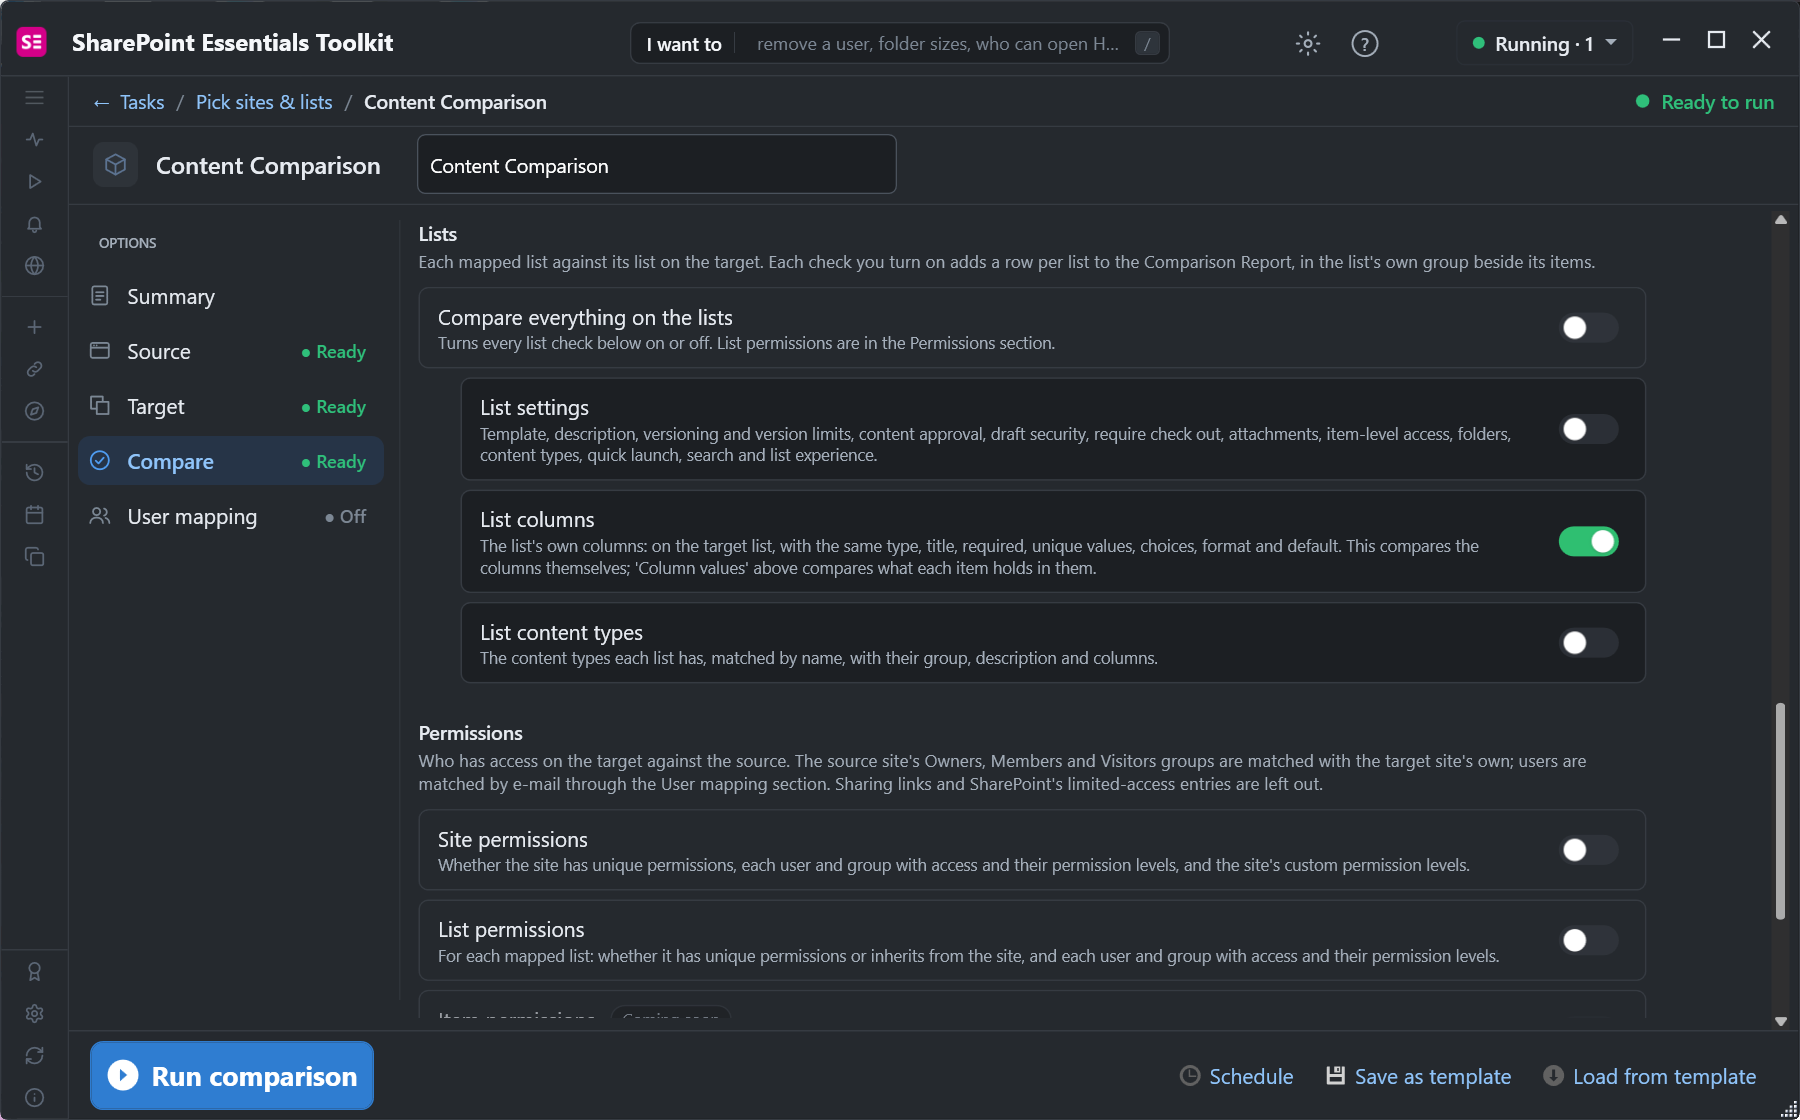
Under Compare, keep Column values on. It covers text, choice, number, date, yes/no, person, lookup and managed metadata columns. We turned off file size, dates, authors and version so the report shows metadata differences only.
Further down, under Lists, turn on List columns to compare the columns themselves: their type, title, required setting, choices, format and default.
3. Read the comparison report
Select Run comparison. It took 0.20 minutes for 76 items. Every item came back as Metadata differs, and the Mismatched Metadata column says why, for example "Client: Tailspin Airports → (column not on target)". The list row shows Columns · 6 of 13 missing: the six project columns don't exist on the target library. Where both sides have a column, the report shows both values.
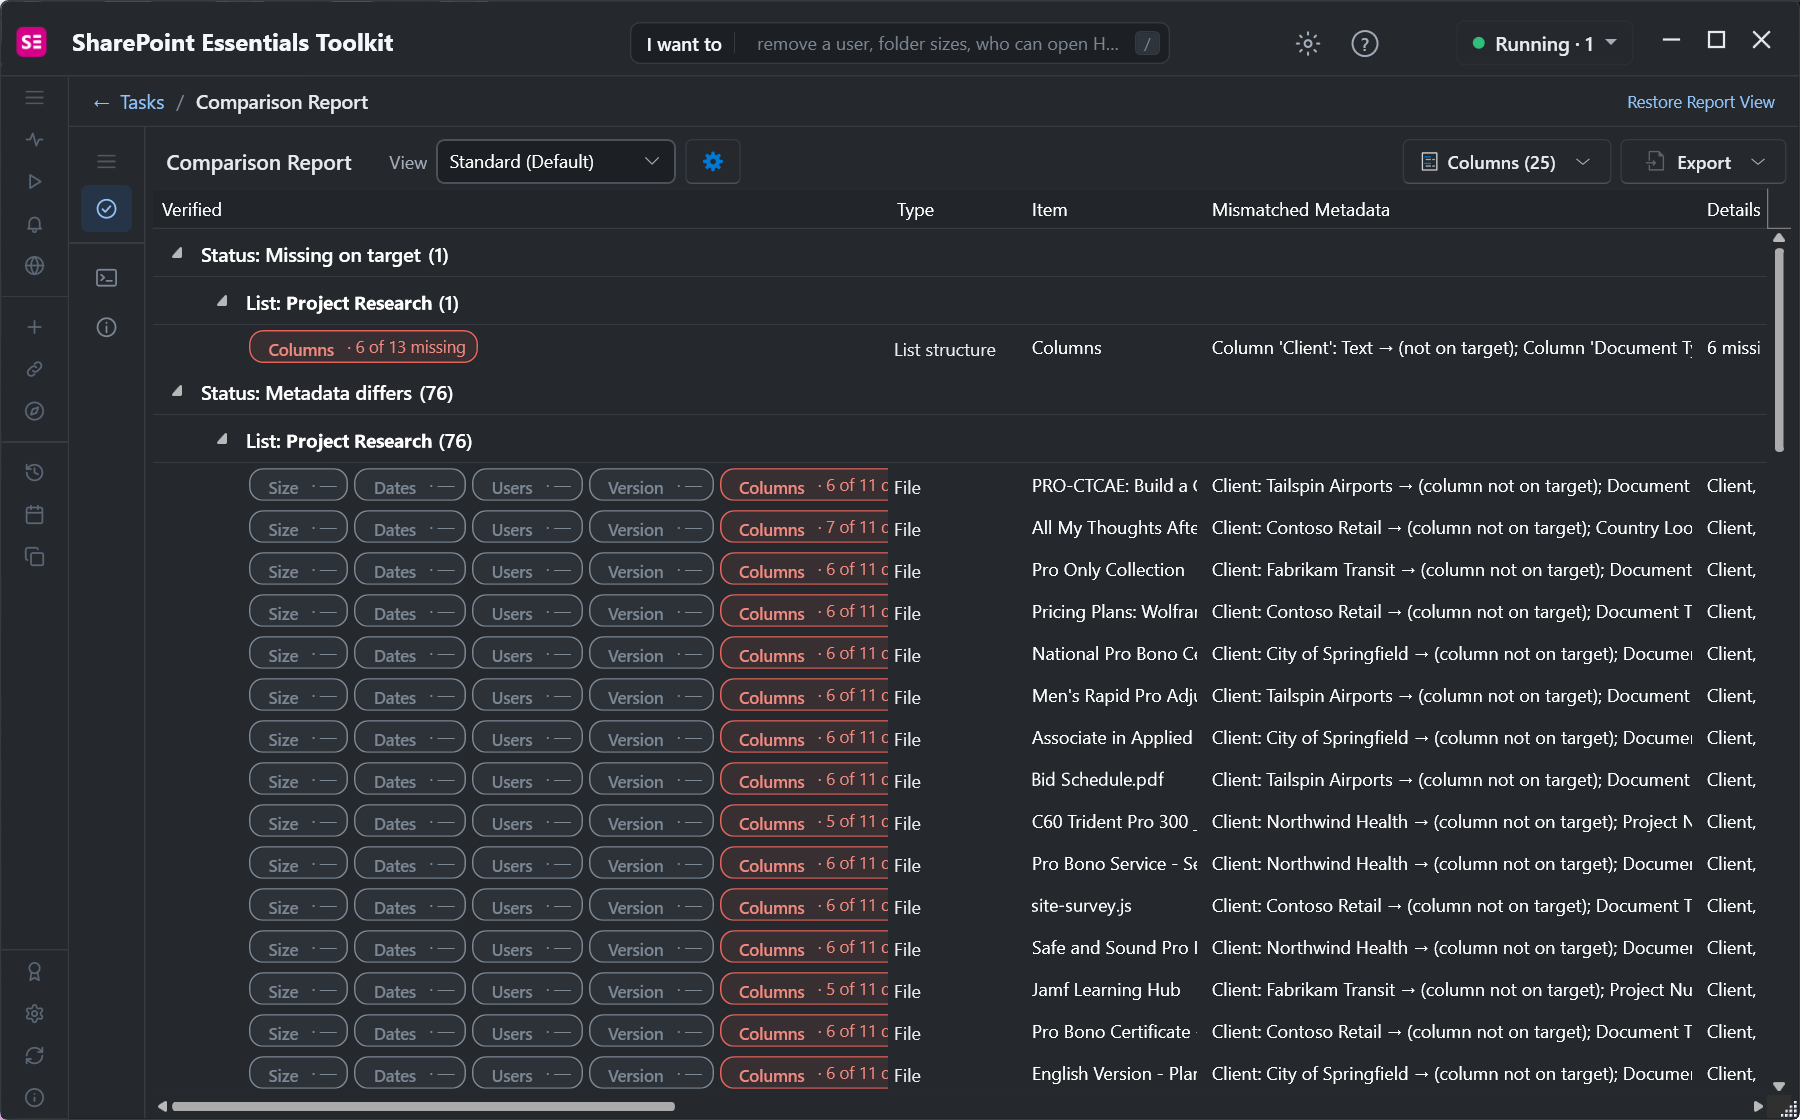
Nothing is changed on either side. We checked the target library afterward: it still had 76 items and the same last-modified time. To bring the metadata across, copy the library again with metadata, as in Move or copy files between sites and keep metadata, or add the columns on the target and bulk edit the values.
Which approach should you use?
| Need | Built-in export | PowerShell | SharePoint Essentials Toolkit |
|---|---|---|---|
| One library, current view | Yes | Yes | Yes |
| Many libraries and sites in one report | No | Yes, with a script | Yes |
| Across site collections | No | Yes, one sign-in per site | Yes, in one job |
| Person and managed metadata as text | Yes | With extra code | Yes |
| Compare metadata between two lists | By hand in Excel | With a second script | Yes, Content Comparison |
| Compare list columns (schema) | No | With more code | Yes |
For a site-wide view of sites, lists, sizes and item counts rather than column values, see the SharePoint inventory report.
Frequently asked questions
Can I export metadata from a SharePoint document library to Excel?
Yes, one library at a time. Select Export, then Export to Excel, with no files selected. Excel opens a web query of the current view, so only the columns and files in that view are included. Document libraries don't offer Export to CSV. To export many libraries or sites into one file, use PnP PowerShell or SharePoint Essentials Toolkit.
How do I report on SharePoint metadata across site collections?
SharePoint has no built-in report that spans site collections. With PnP PowerShell you connect to each site in turn and read every list's items. In SharePoint Essentials Toolkit you tick every site you want in one job, name the columns, and the report lists every file and item with its site, list and column values in one grid.
How do I compare metadata between two SharePoint lists?
Export both lists and compare the files by name and column, in Excel or with a short PowerShell script. SharePoint Essentials Toolkit has a free Content Comparison report that does this between two sites: it matches each item, flags Metadata differs, Missing on target or Only on target, and lists the differing values. It also compares the lists' columns.
Does a SharePoint metadata report include managed metadata and person columns?
It should. Managed metadata, person, lookup and multi-value columns are stored as objects, not text, so a script has to turn each one into a label, name or email before writing a CSV. SharePoint Essentials Toolkit shows them as readable values in the report and in its Excel and CSV exports.
Is the SharePoint metadata report free in SharePoint Essentials Toolkit?
Yes. Community Edition is free on up to 20 sites per Microsoft 365 tenant, and reporting is not capped: the item and metadata report and the Content Comparison report run at full depth. Export to Excel and CSV is included. Paid editions add more sites and bulk changes beyond 10 per Apply.
Does comparing two SharePoint sites change anything?
No. The Content Comparison report only reads both sites. It looks up each source item on the target and records what differs. We checked the target library after our test: it still had the same 76 items and the same last-modified time. To fix differences, use bulk edit or copy, which are separate jobs.
Report on SharePoint metadata free on up to 20 sites
SharePoint Essentials Toolkit Community Edition is free. Report the column values of every file and item across sites and site collections, export them to Excel, and compare lists between sites, with no trial period. Get your free Community Edition license key.